Help Guide
Making awesome looking dashboards is fun. This tool allows you to do that easily!
» Begin with 10 minute New User Training
Here is a summary of basic steps to apply templates:
Browse the templates by using the dropdown in the upper left.
There are two kinds of templates: column templates and view templates.
If you are new, start with column templates. These are simple and easy to understand.
Start by selecting a simple template like Column - Button / Edit.
In this tool, click the yellow Copy Template button.
In your SharePoint list view, select the Format this column option as shown:
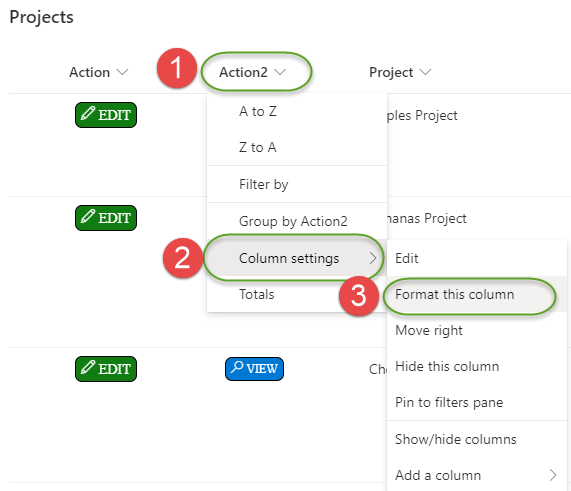
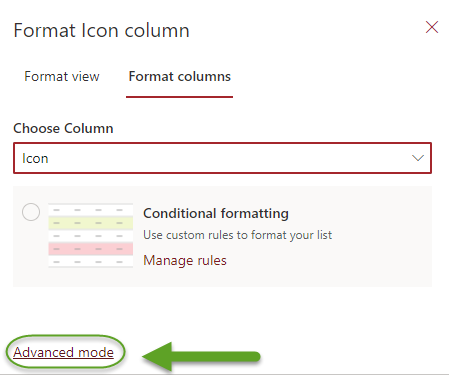
In the side panel, click on Advanced mode:
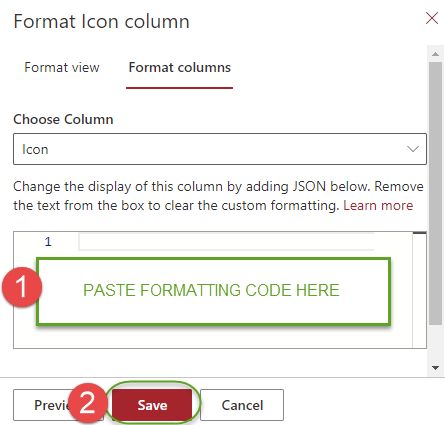
Last, paste the formatting code then save:
View templates, work in a very similar way.
In your SharePoint list view, click the view selector dropdown then select Format current view as shown:
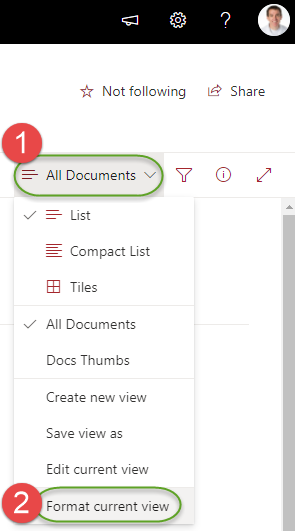
As with column formatting, click Advanced mode, paste the code to the window, then save.
Note that view formatting overrides column formatting. So use that only if you are not using any column formatting.
Some users may find that they don't see the standard login prompt as shown below.
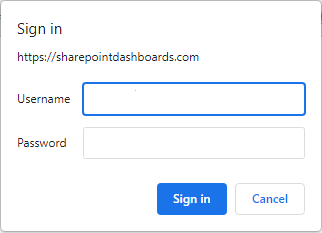
This many be due to a security setting in your browser or your organization may be blocking it.
First try using a different browser, then try logging in outside of your network environment.
If the login prompt is blocked in your network environment, submit a help request to your IT support.
Request that ports 2082 and 2083 are opened for https://sharepointdashboards.com/
SharePoint list and column formatting is supported for specific versions of SharePoint Only. All templates will work for SharePoint Online and SharePoint Server Subscription Edition (2022+). Some templates will work for SharePoint 2019. Earlier versions of SharePoint are not supported. Compatibility is noted in the template notes section at the top as shown:

SharePoint 2019 has limited support due to the fact that it does not support Excel-style expressions. Users must instead rely on Abstract Syntax Tree expressions which are not used in templates on this site. You can read more about both on this page.
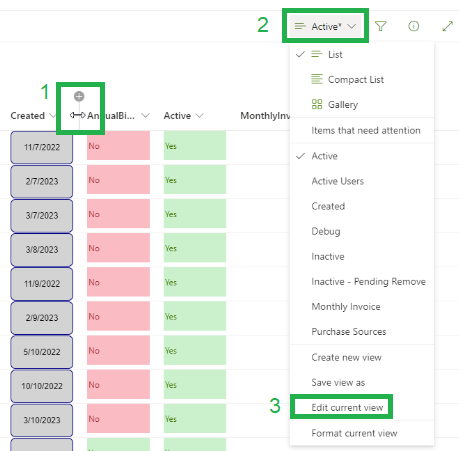
In many cases you will need to change the width of columns in your modern list view.
This can be done in three steps as shown.
1. Click between the column headers and drag the width using the handle control.
2. Click on the list view dropdown.
3. Edit the current view then click save on the next screen.
SharePoint Dashboards offers a Complete Charts Training Program.
Learn by doing hands on step by step training with examples.
» All training content can be accessed here.
Chart Templates tagged with (1 Row) render a chart from a single list record like this:

If you have multiple rows, a chart will be rendered for each row.
Often, you need to take additional steps to aggregate your data. There is more than one way to do this.
The most efficient and advanced approach is shown in this video:
A simple approach which involves manual updates takes advantage of List View totals functionality.
To get count, average, max, min, sum or variance for a list, you can use the Totals option in the list view settings::
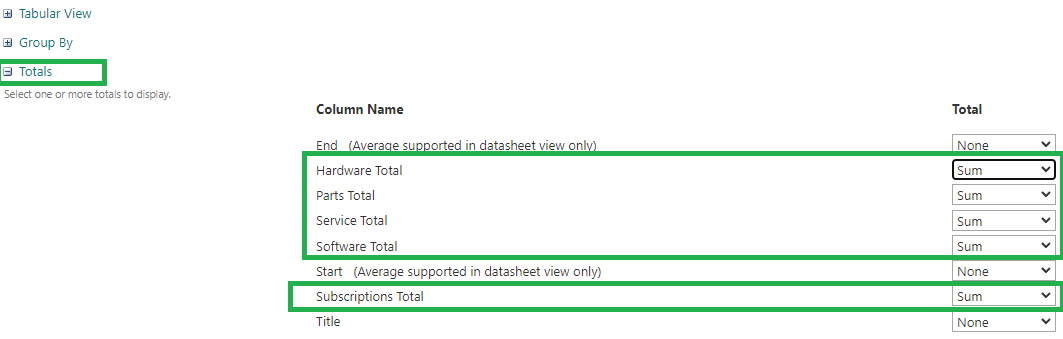
This will show you aggregated values at the bottom of your list view:
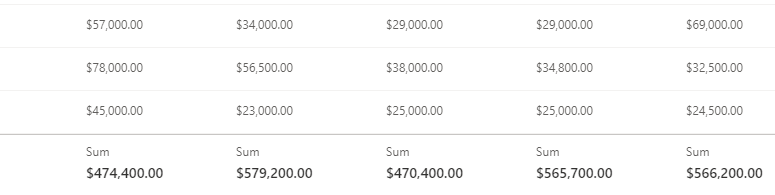
You will need to copy these values to a different list where each of these values are stored in one row.
A more advanced automated approach is to use a Microsoft Power Automate Flow to automatically perform the calculations and update the target record. This can be triggered manually or on a reoccurring schedule.
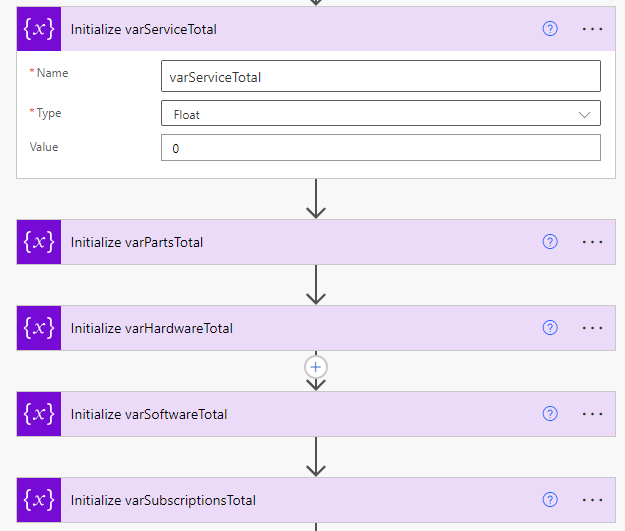
In your Flow, create a variable to store each aggregated total:
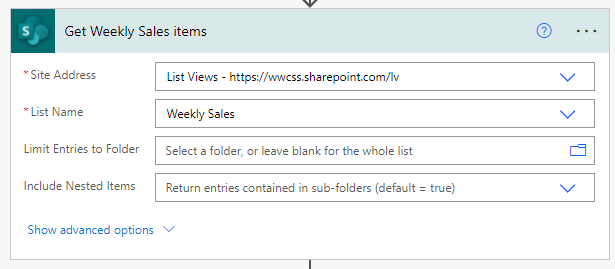
Use the Get Items function to access the list which contains the data:
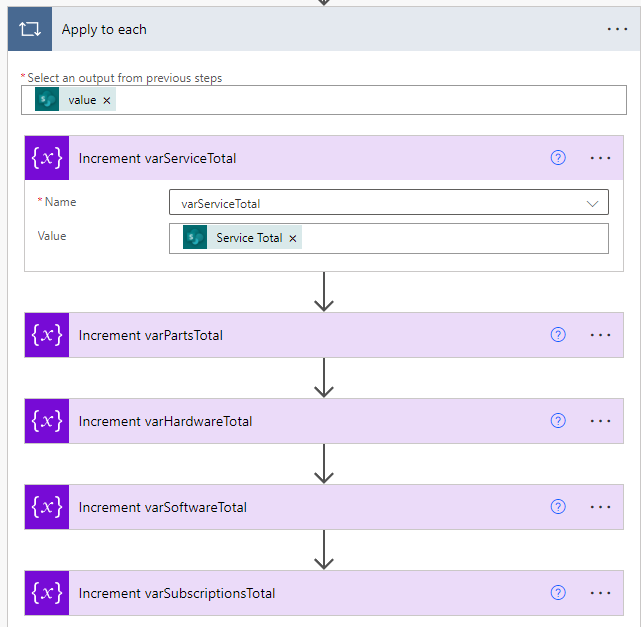
Use an Apply to each block and the increment function to update the variables for each record:
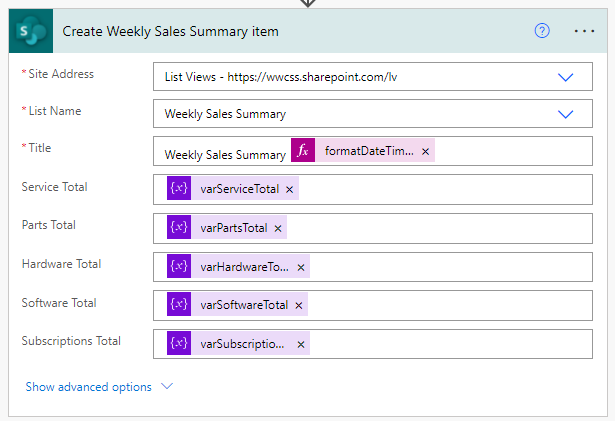
Last, create or update a summary record which will be used to render the chart. Pass along the aggregated values stored in the variables:
The new Flexible Sections functionality in SharePoint pages allows for great looking SharePoint dashboards. With this feature, it is possible to place elements into the page with much greater flexibility. In this video, you can learn how to combine charting and other elements together in one page.
You can save a configuration for later use by clicking the Config button:
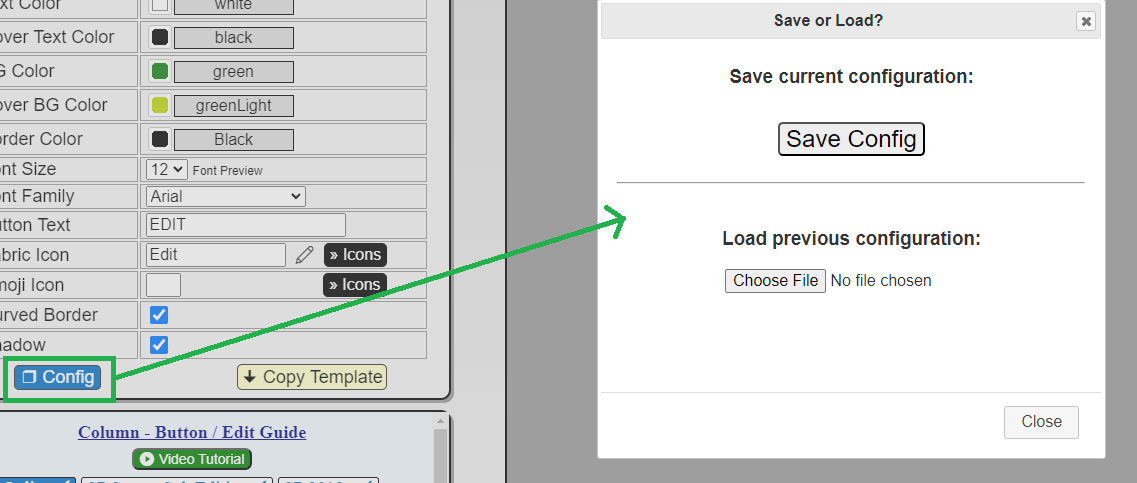
Click Save Config to download the configuration to your computer.
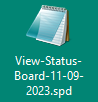
Your file will be downloaded to your default downloads folder with an .spd file extension.
The file will be named according to the template name and the current date.
You can keep your saved configuration files in a folder for later use.
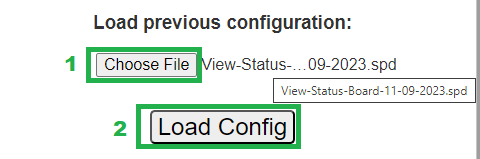
To load a configuration file, Choose File to browse for the file on your computer. Then click Load Config.
You must always reference internal field names with SharePoint Dashboards templates.
Review this information carefully then take the quiz below.
If you create fields without spaces and without special characters or numbers, you will never experience problems. This is the easiest approach.
When you first create a SharePoint field, its internal field name is defined which will never change (even if you rename the field).
Get the internal field names for each field by following these steps:
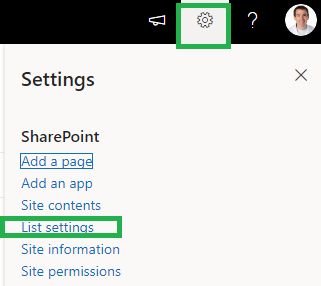
1. Click the gear, then click List settings.

2. In the "columns" section, hover over each field. A URL will be displayed at the bottom of the browser window which reveals the internal field name shown at the end. Alternatively, click on the field to go to the field settings screen. The field name is shown at the end of the URL at the top of the page.

3. Always reference the internal field name in SharePoint Dashboards templates.
All SharePoint lists have pre-existing built-in fields including Title, Created, Created By, Modified and Modified By. These two have special internal field names:
The Created By field has an internal field name Author.
The Modified By field has an internal field name Editor.
Additional notes:
When using column formatting it is often the case that you need a column to hold a button or content without referencing any field values. In this case, you only need to have a column set aside to hold the content.
You can simply create what can be described as a Placeholder Field that won't be used to store any data. A simple text field will work fine, but the downside is that users will be prompted to enter data for the field even though you don't intend for anything to be entered.
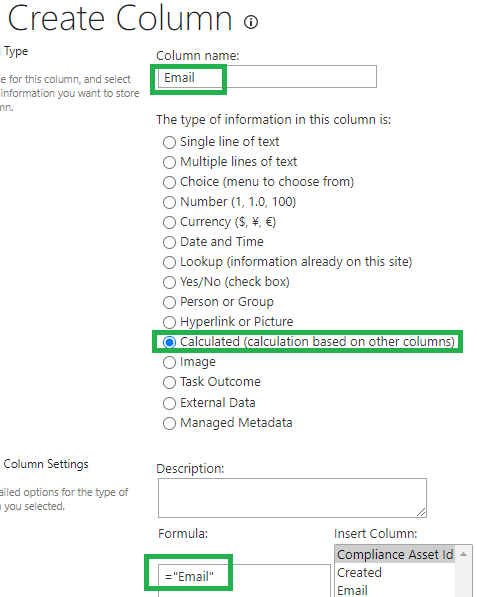
A better approach is to use a Calculated Column.
Create a Calculated Column and use ="Placeholder" (or similar) in the formula section. It doesn't matter what you use for the formula, but you must have a formula. Name the column whatever you want to appear on the list view header.
Using view settings, select the column to be shown in your view, then format the column using the normal process.

Because this is a calculated column, users won't be prompted to enter data for this field.
Person fields and Lookup fields can be used in cases where text fields or choice fields are otherwise expected.
In this case the field references should be appended with an additional attribute.
For Person fields, add .title
For example, a People field called Manager would be referenced as Manager.title
For Lookup fields, add .lookupValue
For example, a Lookup field called Customer would be referenced as Customer.lookupValue
In the SharePoint Dashboards template settings it should look like this:

Single quote (apostrophe) and double quote characters must be escaped in some situations. For example if you are evaluating a value in a choice field that contains a value like "User's Computer".
In general it is best to avoid using these characters in field options, but sometimes this may be required.
Your template code must be adjusted to escape these characters.
Use two backslash characters to escape single quotes like this: \\'
Use one backslash character to escape a double quote like this: \"
Example:
"txtContent": "='Single quote: \\' use 2 backslashes' + 'Double quote: \" use one backslash'"
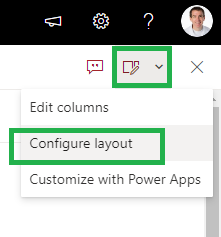
Forms can be customized through a settings menu in the display form. You can most easily get to this panel by clicking the title field which is the first field display by default in the list view. Click on the small icon in the upper right then click Configure layout as shown:
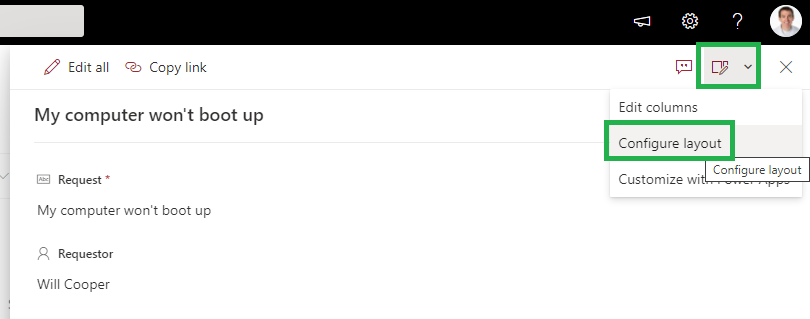
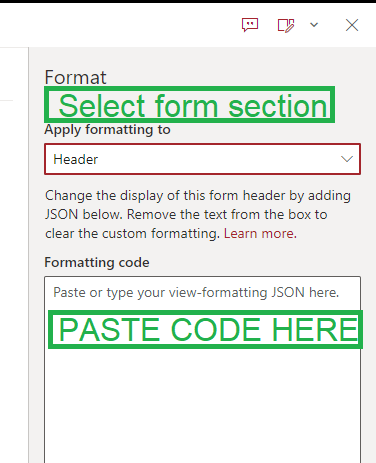
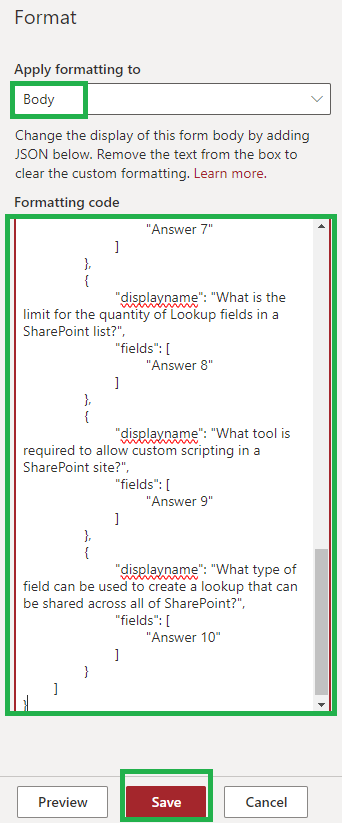
Templates can be applied in 3 parts of the form Header, Body or Footer. Select the section to be customized then paste in the template code:
In some cases you may need to hide fomatted columns from the SharePoint form.
Some formatting templates are intended to work only in the context of the SharePoint list view.
You must first make sure that any column that you want to hide from the form is set not required in the field settings.
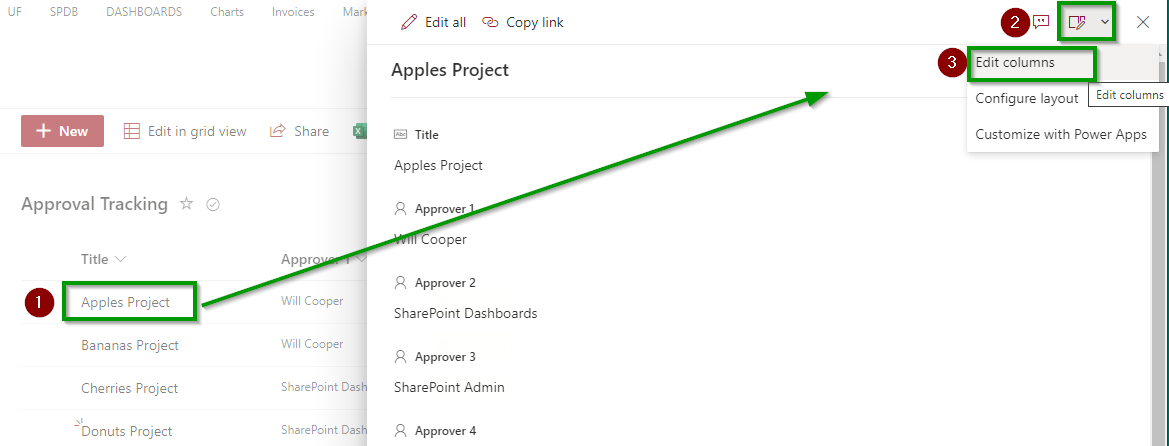
Begin by clicking on the Title field to open the list record display form. Next click on the form settings dropdown and select Edit columns.
Uncheck the columns that should be hidden from the form then click Save.
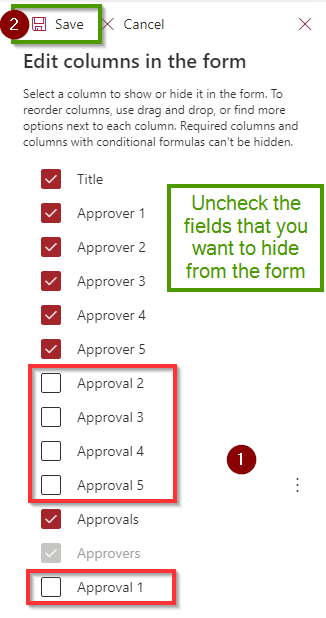
When your users access the form, these fields will no longer be displayed.
The fields will only be accessed from the list view.
Read more here: » List form show and hide fields
(Creating the custom permission level only needs to be done the first time you make a test.)
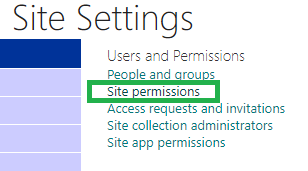
Go to the site collection settings screen and select Site permissions.
Select Permission Levels.

Select Add a Permission Level.

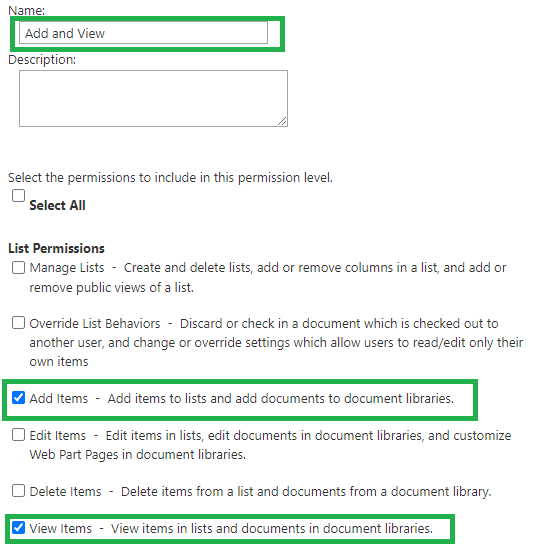
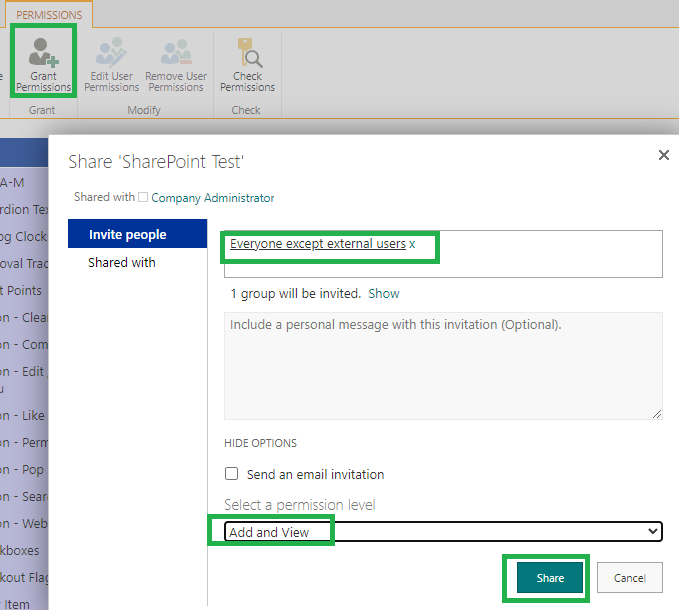
Enter the Name Add and View. Select the Add items and View Items permissions. (Note that some other checkboxes below will be auto selected.)
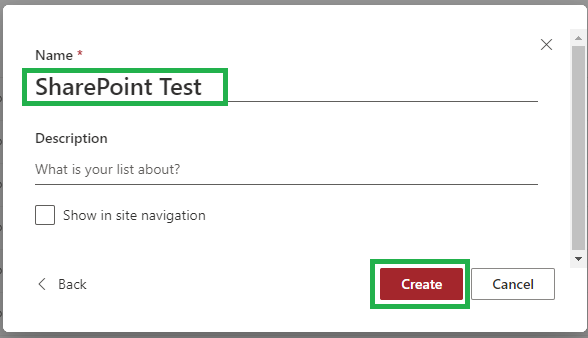
Create a new SharePoint list using your Test Name.
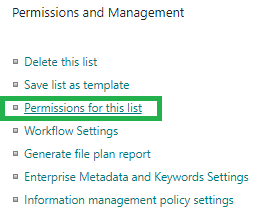
Go to the List settings.
Go to Permissions for this list.
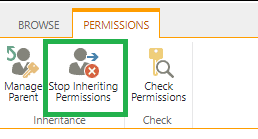
Stop Inheriting Permissions.
Add the people / groups that will taking the test. Select the new Add and View permission level that you created previously. Click Share.
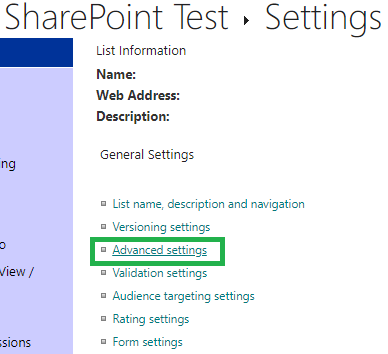
Return to the list settings screen and select Advanced settings.
Adjust Item-level Permissions as shown.

Disable Attachments.

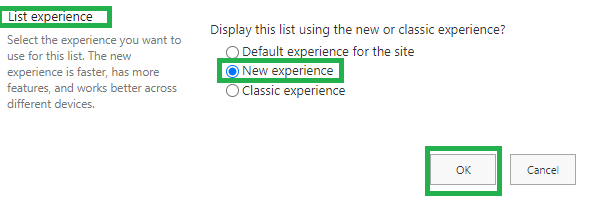
Set List Experience to New Experience then Click OK.
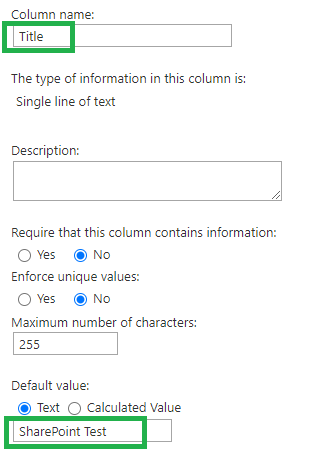
Update the Title field to default to the name of your Test.
Add a required Person field named "Name". This is for the name of the person taking the test.
Add a required Date field named "Date". Set this to default to Today's Date.
Answer fields must follow these requirements:
Add required Answer fields using the naming pattern "Answer #" beginning with "Answer 1".
Use field types Text or Choice only.
When creating fields, deselect Add to default view.
Use the Radio Buttons option when creating Choice fields. This allows users to see all options at once.
You questions will be provided in the next part of setup.
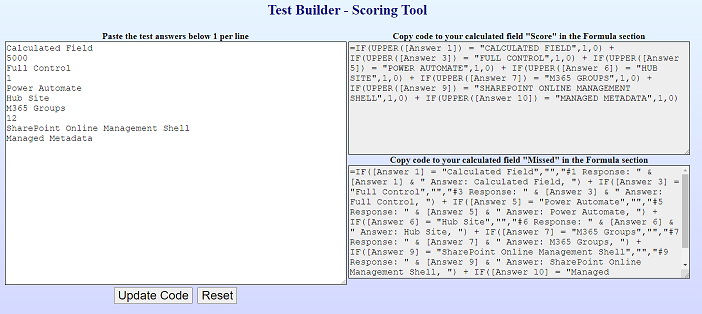
In the next step, you will paste in the answers to your questions to the box in the provided tool linked below.
Add a Calculated Column named "Score" and paste in the formula provided. (Data type returned: Number)
Add a Calculated Column named "Missed" and paste in the formula provided. (Data type returned: Single line of text)
Before applying the template, add a dummy record to your list.
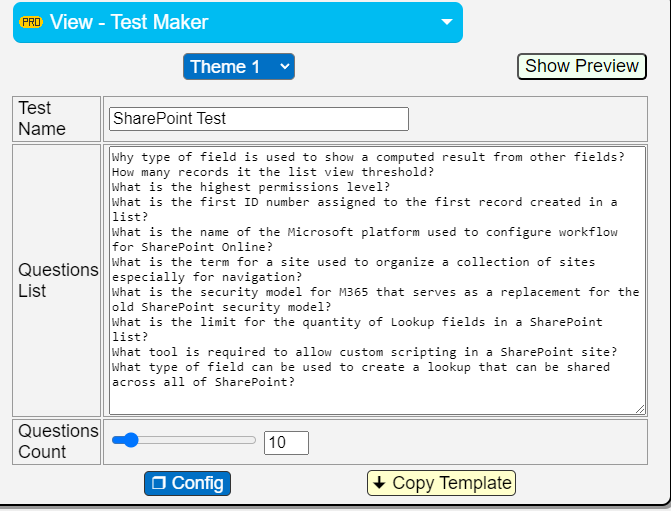
In the SharePoint Dashboards site, enter the name of your test, paste in your questions list, and select the Questions Count. Click Copy Template.
In your SharePoint list, click the title field for your first record, then click "Edit Form" dropdown, then select Configure layout.
Select Apply formatting to Body, paste in code, then click save.
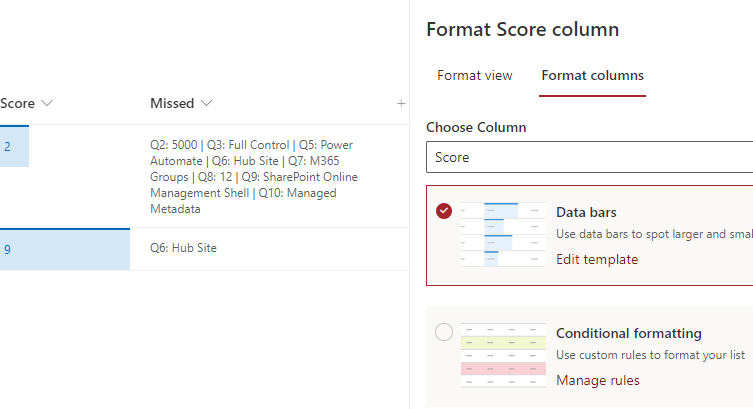
Click the Score column header and apply formatting to the Score column as shown.
Your test set up is complete! Note that test takers will only be able to see their own submissions and will not be able to modify their test after submitted. Create a new list for each test that you want to create.
Some Dashboard templates require creating a Gallery view. This type of view displays each list record as a tile. Be sure to apply your template to this view after it has been created.
Creating the view will look like one of these two options depending on your environment:
Modern List View Experience

Modern Microsoft Lists List View Experience

SharePoint Dashboard Maker comes with a large set of custom icons which you should download named icons.
The Animated Progress Bars template requires downloading the animatedbars image set.
The Animated Status Icons template requires downloading the animatedstatus image set.
The Animated Warning Icons template requires downloading the warning image set.
The Analog Clock template requires downloading the clock image set.
The Bulletin Board template requires downloading the backgrounds image set.
The Current Weather template requires downloading the weather image set.
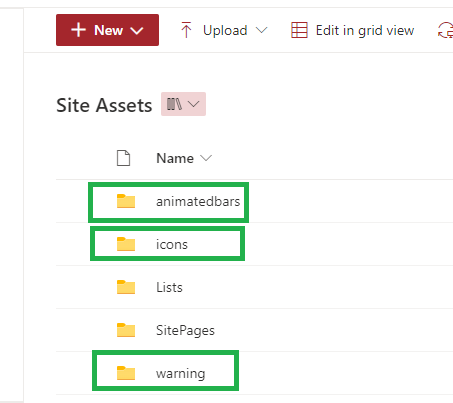
First unzip the files on your local computer, then upload the full directory to your SharePoint site in the Site Contents / Site Assets directory.
This is required in order to use any of the formatting examples with custom icons.
The icons directory contains these subdirectories:
Note that there is a folder named myicons which you can use to load any of your own custom icons.
The Microsoft Fluent UI icons do not require these images. These are already incorporated into SharePoint.
This is an example of how your Site Assets directory will look with some image directories loaded:
Images from outside of SharePoint are blocked by default.
In order to use many templates, you must disable this security blocking so that images load as expected.
First make sure that you have been granted Site Collection Administrator rights in the site that you are working in.
Image source security is described here.
For each site where you want to use image based dashboard templates, you must:
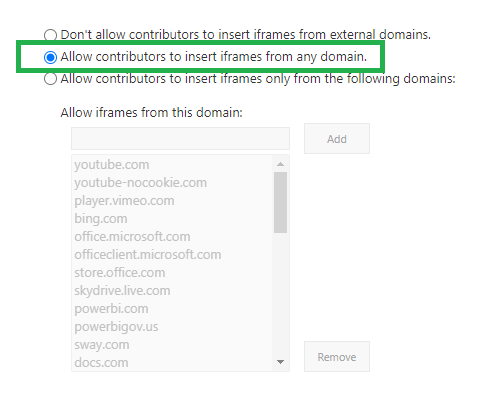
If you must enable images on a site by site basis, you can use the Allow contributors to insert iframes only from the following domains option and add these sites:
More detailed information from Microsoft here
The image column stores images differently depending on whether list attachments are enabled.
When using any template that includes an image column, attachments should be disabled.
(Or use workaround described below.)
Attachments can be disabled by going to List Settings then click on Advanced Settings.

Set attachments to disabled.

If attachments are enabled, the link to the image will become broken in the template.
As an example, here is a comparison of the image path for an image with the setting on or off:
Image path with attachments disabled:
https://YOURTENANT.sharepoint.com/lv/SiteAssets/LISTGUID/apple.png
Image path with attachments enabled:
https://YOURTENANT.sharepoint.com/lv/_api/v2.1/sites/85cbba03-b67c-4f33-a472-d6845f53f728,c284363a-ed18-449f-ab93-3be15c2d7780/lists/de6c11d8-2e6f-4b11-bd34-d2782eb7a8db/items/1/attachments/Reserved_ImageAttachment_%5B10%5D_%5BScreenshot%5D%5B5%5D_%5Bapple%5D%5B1%5D_%5B1%5D.png/thumbnails/0/c48x48/content?prefer=noredirect%2Cclosestavailablesize
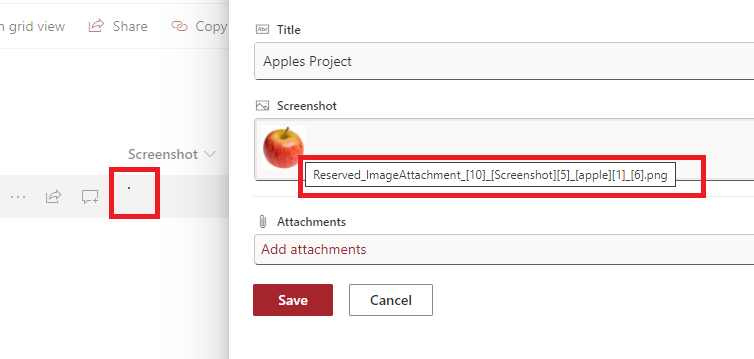
Illustration of the image problem caused when an image column is used and attachments are enabled on a list.
There is a workaround (if your list must use attachments) using the getThumbnailImage function.
Find and replace areas in your code that look like this:
"src": "YOURIMAGEFIELD.serverRelativeUrl"
Replace with this, where the width and height of the image are provided:
"src": "=getThumbnailImage(YOURIMAGEFIELD, 400, 200)"
getThumbnailImage definition: returns a URL pointing to image for a given image field and preferred size.
"src":"=getThumbnailImage([$ImageField], 400, 200)"
results in a URL pointing to image for a given image field with 400 width and 200 height
Some SharePoint Dashboards templates have a corresponding list template file that can be downloaded. This is a file with an ".stp" file extension.
The SharePoint Dashboard template notes will indicate whether it is optional or required to use this file.
Follow the below steps to use the list template file.
Alternatively, you may create lists through automation:
You can download the corresponding list template ".stp" file by clicking on the link in the notes section.
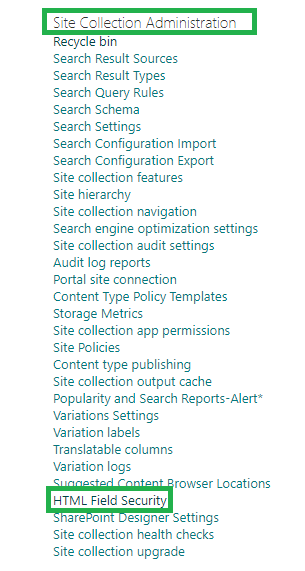
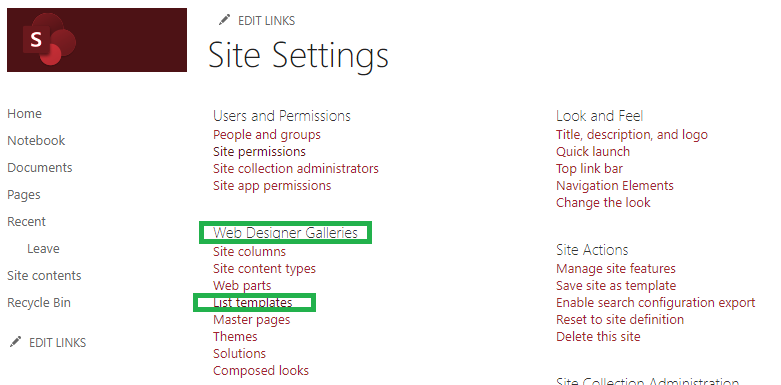
The next step is to load the template to the List Template Gallery which is linked from the Site Settings screen under the heading Web Designer Galleries.
If you don't see the Web Designer Galleries heading you will have to perform some additional steps. In this case, you need to enable custom scripting for this site. Ask your SharePoint Administrator for help if you don't have rights to do these steps.
Follow these instructions to get connected to SharePoint Online Management Shell.
Detailed Microsoft guide on allowing custom scripts in SharePoint Sites.
In SharePoint Online Management Shell as an admin, you first log in using a command in this format (switch "MYDOMAIN" to your own domain):
Connect-SPOService -Url https://MYDOMAIN-admin.sharepoint.com
Next you need to enter in this command (adjust MYSITEURL to the URL of your site):
Set-SPOSite MYSITEURLHERE -DenyAddAndCustomizePages 0
You will know that the command executed correctly if there is no error message displayed.
Note that this setting will automatically be reset each 24 hours by an automated process.
Now you will see the expected options appear in your site settings screen.
The gallery screen looks like this:
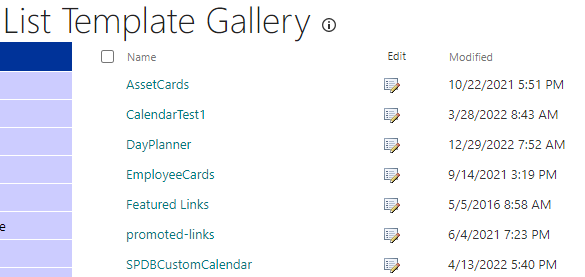
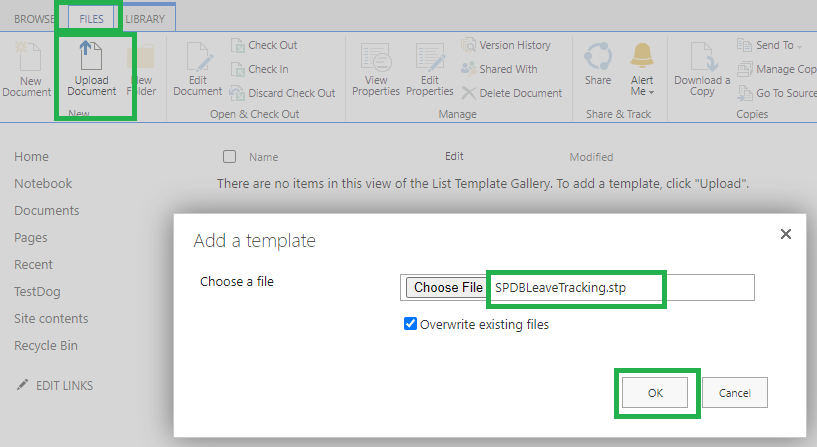
Upload the provided template by clicking Files » Upload Document » Choose the file » Click OK.
Now this list template will be available for creating new lists in your site.
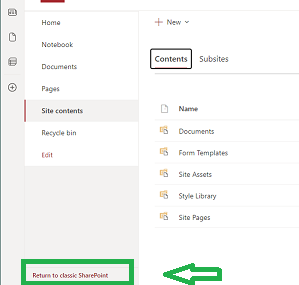
To create a list from the template, go to the Site Contents and click on "Return to classic SharePoint" in the lower left corner of the screen. You won't be able to access the template unless you switch to this mode!
Note: If you do not see the "Return to classic SharePoint" link option, follow these steps:
In your browser hit F12 to open the developer tools.
To make the classic site contents page load, in the Console tool enter this command:
document.cookie = "splnu=0;domain=" + window.location.hostname + ";"; location.href = _spPageContextInfo.webServerRelativeUrl + "/_layouts/15/viewlsts.aspx";
To switch back to the modern site content page, in the Console tool enter this command:
document.cookie = "splnu=1;domain=" + window.location.hostname + ";"; location.href = _spPageContextInfo.webServerRelativeUrl + "/_layouts/15/viewlsts.aspx";

Click add an app then scroll through the options until you see the template option you just added.
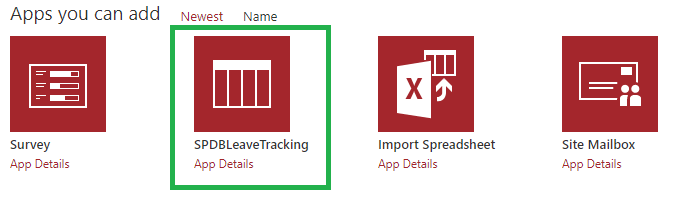
Select that option then name your list whatever you like and click create.
Last, click the link in the lower left Exit classic experience.
You can read more about SharePoint List Templates here
Modern list templates can be provisioned to be accessible across your SharePoint Online tenant.
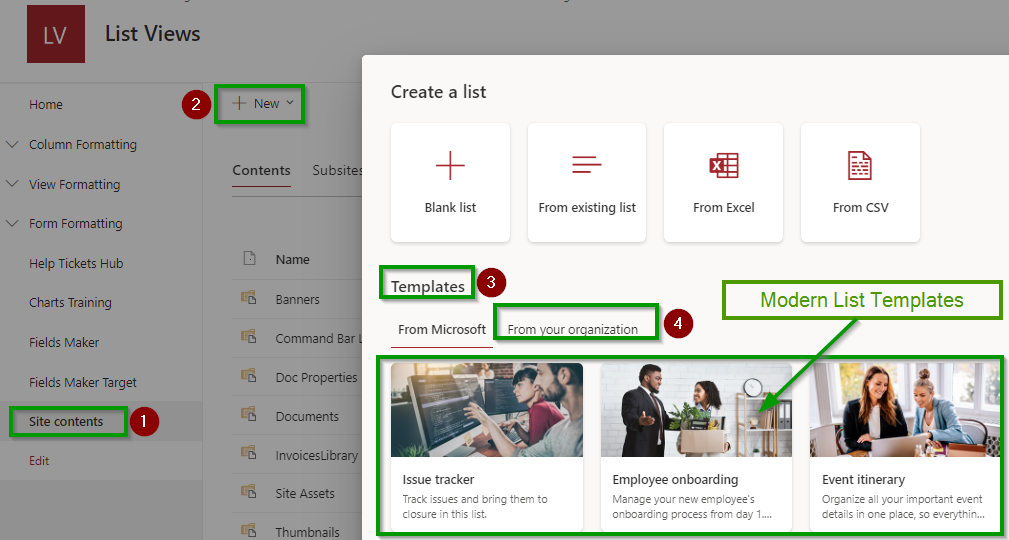
This could be especially useful when using view formatting templates that are popular. You can make these easily accessible and repeatable across your entire SharePoint tenant. Setting up a template in this way allows all of your users to recreate the template with only a few clicks!
You must be a SharePoint administrator in order to do these steps.
In PowerShell (Run as Administrator), you first log in using a command in this format (switch "MYDOMAIN" to your own domain):
Connect-SPOService -Url https://MYDOMAIN-admin.sharepoint.com
Note that in order for users to be able to access custom templates each target site must have custom scripting enabled. If this is not enabled, only the Microsoft out-of-the-box options will be displayed. Enable custom scripting using this command (adjust MYSITEURL to the URL of your site):
Set-SPOSite MYSITEURLHERE -DenyAddAndCustomizePages 0
Prepare a 400px x 200px picture which will be used as thumbnail in the user interface. Load this to the documents libary in your root SharePoint site. You will reference the URL of this picture below.
Determine a color to be associated with the list in the UI from standard Microsoft colors. Here are the values to pick from: DarkRed, Red, Orange, Green, DarkGreen, Teal, Blue, NavyBlue, BluePurple, DarkBlue, Lavendar, Pink.
Determine an icon to be associated with the list from Microsoft fabric icons. You need the name of the icon from this tool.
Enter this command to set your source sharepoint list from which the template will be created. Copy and paste your FULL list url in the code snippet shown.
$sourcelist = Get-SPOSiteScriptFromList -ListUrl "FULL-LIST-URL-HERE"
Enter this command to fully define your script which will be executed in the next step. Swap in your own title and description:
Add-SPOSiteScript -Title "THE TITLE TO SHOW FOR THE LIST" -Description "THE DESCRIPTION TO BE SHOWN FOR THE LIST" -Content $sourcelist
After entering this command, the interface will show you an ID in the response which you should copy and past for the next step.
(The ID will look something like this: 48842591-8f89-4fg2-b335-af5323ae8919)
Now you can execute the final command which will add your custom list template to the SharePoint interface. Swap in options as shown:
Add-SPOListDesign -Title "THE TITLE TO SHOW FOR THE LIST" -Description "THE DESCRIPTION TO BE SHOWN FOR THE LIST" -SiteScripts "THE ID RETURNED FROM LAST COMMAND" -ThumbnailUrl "THE FULL PATH TO THE THUMBNAIL IMAGE" -ListColor MICROSOFT_COLOR_FROM_ABOVE -ListIcon FABRIC_ICON_FROM_ABOVE
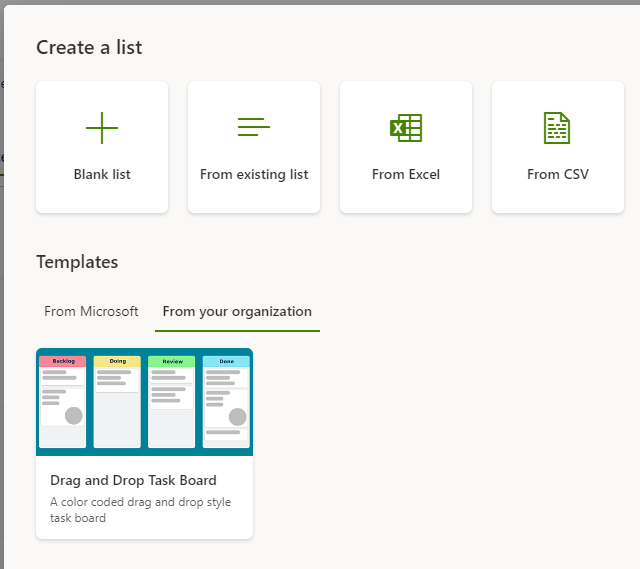
Check your interface to see the result. Your new template will appear in the "From your organization" tab. Here is an example:
You can query for existing list designs in the case that these later need to be removed with the below command. In particular this is helpful to get the ID value needed for additional commands.
Get-SPOListDesign
A previously installed List Template can be removed using this command:
Remove-SPOListDesign YOUR_LIST_DESIGN_ID_HERE
Microsoft is in process of rolling out a new lists user experience to SharePoint.
This makes SharePoint closely resemble the user experience in the Microsoft Lists App.
Overall this includes many benefits which are described in this article.
You can tell whether you are seeing the new Microsoft Lists User Exerience (MS Lists UX) by checking if there is an icon to the left of the list name:

SharePoint Dashboards templates are designed to work both in the new interface and the older Modern Lists interface.
In some cases, there is a slight difference in template configuration. Enable the MS Lists UX setting if shown.
If this setting is not applied, you will see a problem in the output. In the case of charting templates, you may notice a "staircase" effect:

Note that the List Web Part works using the standard modern lists experience. If you intend to display the template inside of a List Web Part, create an additional view where MS Lists UX is disabled and use this view in your Web Part Configuration.
Use of these features in your SharePoint environment may suppress the new lists experience:
Microsoft will eliminate these exceptions going forward.
There are several SharePoint Dashboards templates that require a list with a large number of fields.
The easiest way to set up these lists is by loading the provided SharePoint list templates to the List Template Gallery. This process is described in the List Templates Section.
If you are a SharePoint Admin or Global Admin in your SharePoint environment, you may also use the
PowerShell list creation utility
Another alternative is to use Power Automate for batch field creation. This allows you to create a large series of fields all at once instead of one at a time.
» Create a Power Automate workflow for batch field creation following this guide.
An alternative to list item attachments is to automatically create a folder for each new list items and link to it. Setting up this Flow is easy. Create a flow that runs when each item is created. This flow will make a folder in a library in the same site make use of the ID of the list item:
Files[INSERT ID REFERENCE]

This is much more user friendly than attachments because it allows for batch file load and foldering.
When using the Create Folder workflow, it may be necessary to auto-generate folders for pre-existing list records. In this case, you can create a workflow as shown below using the Manually trigger a flow workflow type and a number input parameter to designate the number of folders to be created.
This workflow will auto-generate a set of folders from 1 to N where each folder is created with a number at the end of the name. The workflow increments the number using a Do until loop.

The "Copy Item Button" template requires a Flow to be created as described below.
Follow these steps before setting up your button.
Begin by logging in to Power Automate.
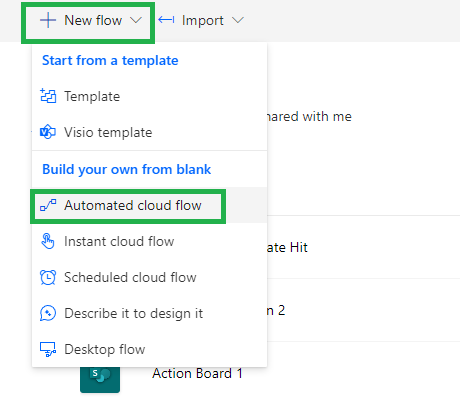
Click + Create link on the left navigation.
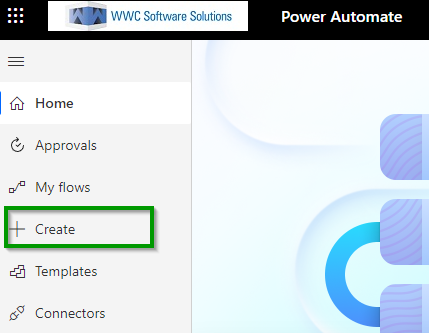
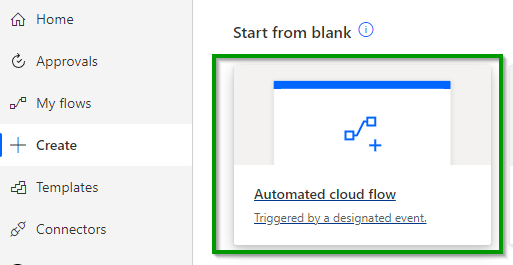
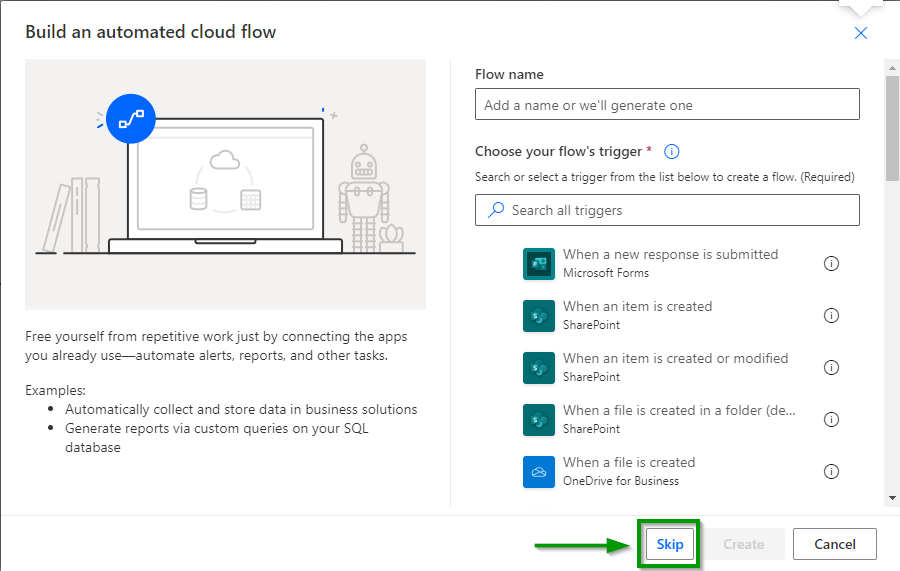
Click Automated cloud flow.
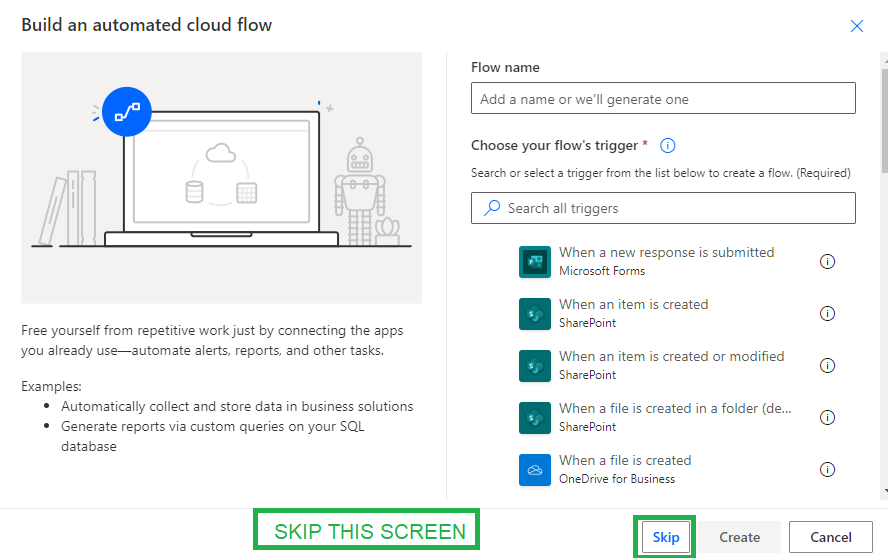
Click Skip.
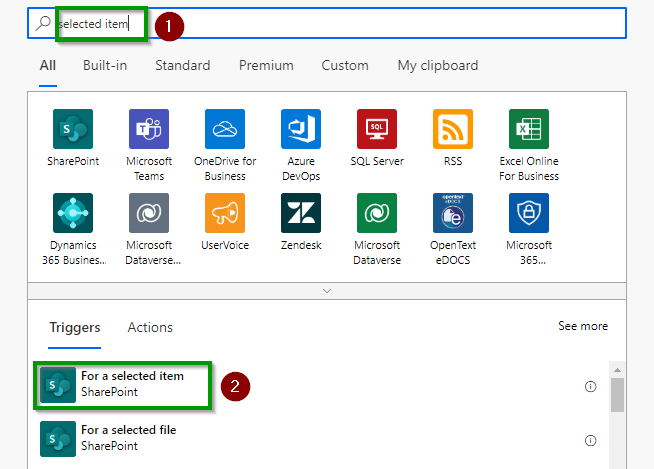
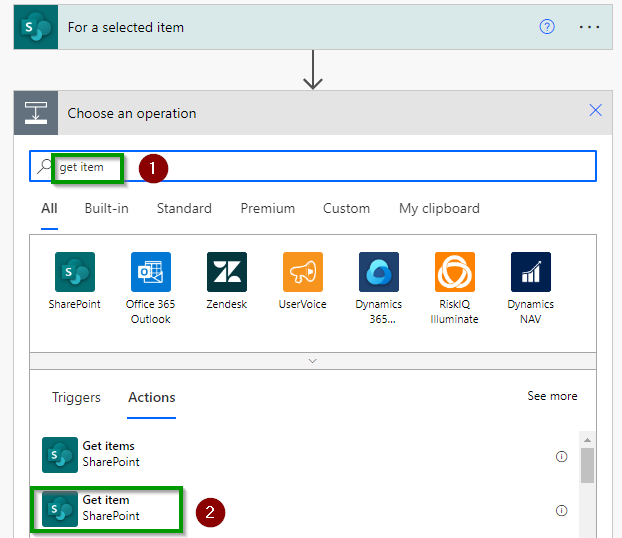
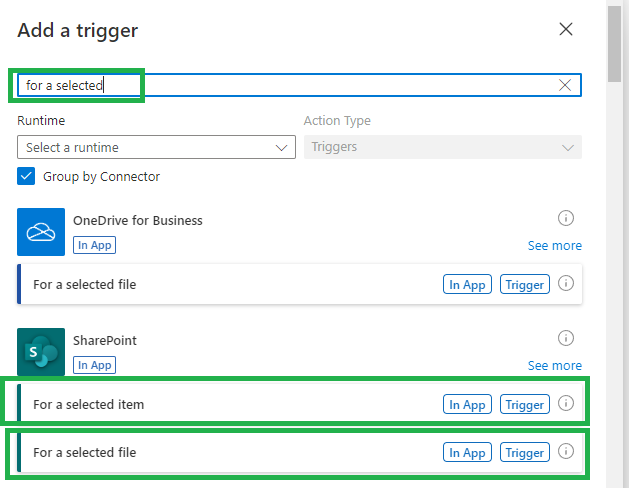
In the search box type selected item.
Click the For a selected item option below.
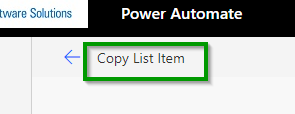
In the upper left click in to the Flow name and enter Copy List Item.
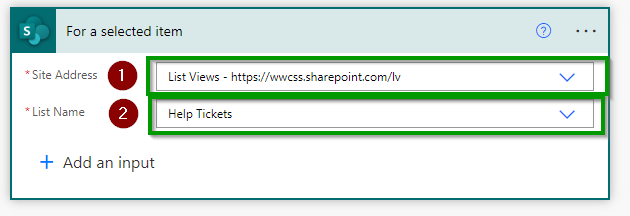
Select the Site Address and List Name.
Click the + New step button.
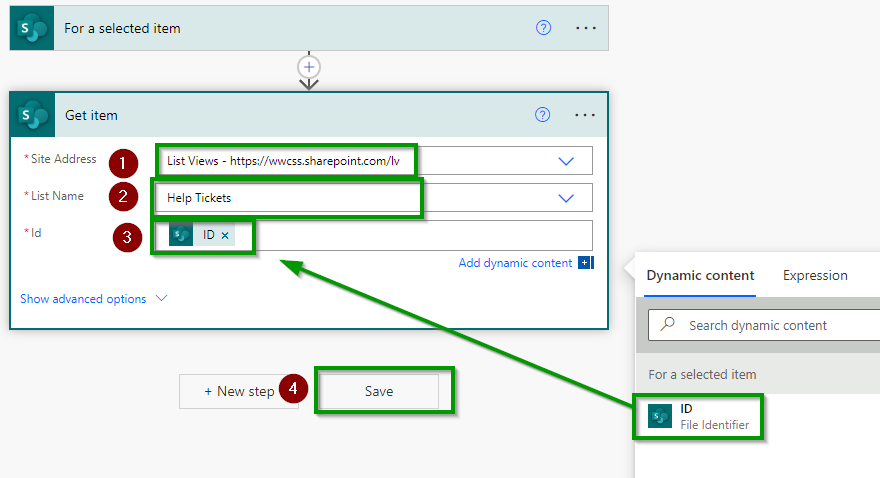
Type get item then click Get item below.
Select the Site Address and List Name.
Next select the For a selected item ID from Dynamic content.
Click Save.
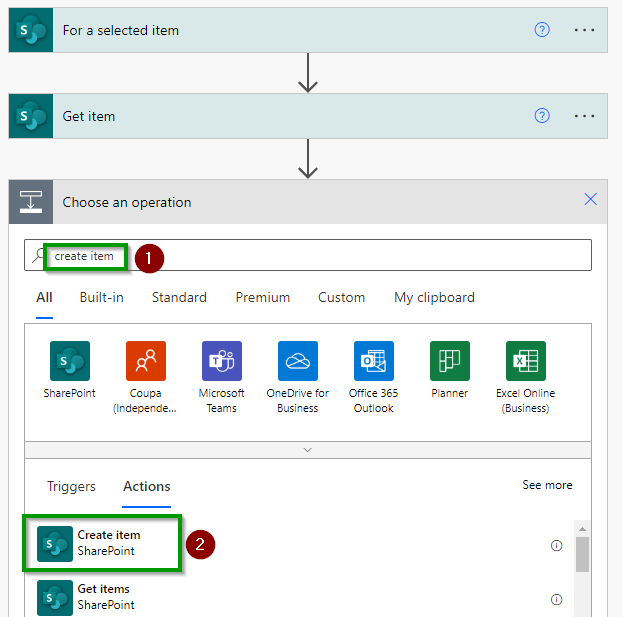
Click the + New step button.
Type create item then click Create item below.
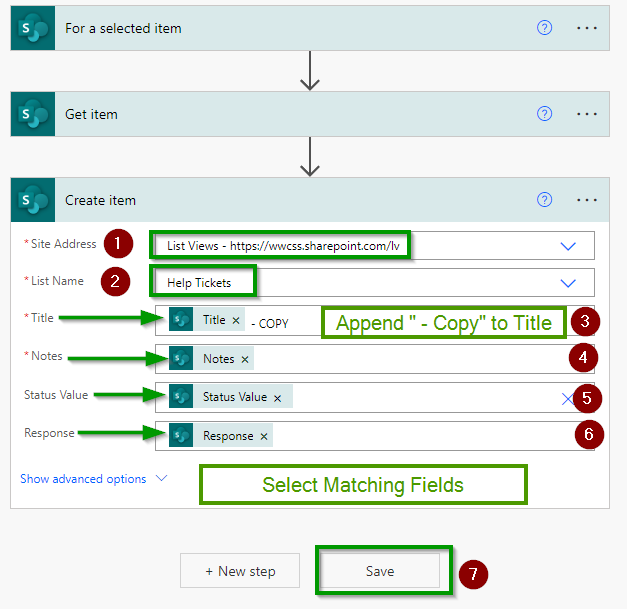
Select the Site Address and List Name.
Select the matching field names from Dynamic content options.
Append the text " - COPY" to the Title field as shown. Click Save.
Click the back arrow next to the Flow name in the top bar.
Get the unique Flow ID from the URL as shown.
The Flow ID is the string of characters immediately after /flows/ in the URL.

The Current Weather requires building a basic workflow to regularly update the weather information.
Create a scheduled cloud flow that will run as often as you wish. (Example shows each 10 minutes.)

Use the Get Items action to get all items in your weather list:

Use an Apply to each loop acting on the results from Get Items above:

Use the Get current weather Flow block passing in the location store in the Title field of the list. Be sure to pick the correct units option according to your region. (Do you use Fahrenheit or Celcius?)

Write the weather information back to your SharePoint list record as shown:

Date Time formatting in Power Automate workflow is needed to make date time output easy to read. This site includes a handy tool which allows you to check formatting output before adding it to your workflow.

Power Automate Date Time Formatting Tool
Power Automate Flow button templates require using For a selected item or For a selected file as the trigger for the flow.
These templates will not trigger flows using any other trigger condition
To create a flow using this type of trigger, begin by selecting New flow and Automated cloud flow
On the next screen, click Skip. Note that if you search for the Flow here, it will not appear in the search results.
In the search box enter "for a selected" then choose either "For a selected item" if using a list, or "For a selected file" if using a library.
Using a Power Automate Flow, it is possible to count the total number of files in folders including all subfolders. This Flow can be scheduled to run on a recurring basis to display useful file count information for all files in a library.
Create a number filed in your library called "Files" to store the count which will be updated by the flow.
To create a flow using this type of trigger, begin by selecting New flow and Scheduled cloud flow
Flow workflow steps are shown.

Begin by getting all files and all folders in two get files blocks.

Next use a Filter Query to get the total number of files in each folder. Update the "Files" field with the total count.
Full instructional video is here:
Pages can be created as templates which can then be deployed to many different SharePoint sites using a special Page Template System. This can be especially useful when wanting to repeat use of SharePoint Dashboards templates across multiple sites.
» Learn how to set up the Page Template System here.
Repeating calendar events workflow can be created following directions in this linked tutorial:

Repeating Events in SharePoint using Power Automate
The Reservation System template can be optimized by including this workflow which detects and prevents double bookings.
Create this flow by selecting New flow then Automated cloud flow.
Select When an item is created or modified then click create.

Name your flow Reservation is Created or Modified or similar. Next select your site and list.

Initialize a Boolean variable "scheduleConflict" defaulted as false as shown. Be sure to add the logical "false operator" using the formula tool.

Add a Get items action using advanced options to add a Filter Query as shown. This filter query will select items in the list as follows:
Where DateTime of each item is between midnight on trigger item date and midnight the following day. (24 hour window.) Also this will exclude the item just created.
The first formula is: formatDateTime(triggerOutputs()?['body/DateTime'],'yyyy-MM-dd')
The second formula is: addDays(triggerOutputs()?['body/DateTime'],1,'yyyy-MM-dd')

Next create an Apply to each loop from the get items block above. Use value from List of Items.

In the first conflict check, we want to check if either the trigger item or the item being compared is an "ALL DAY" reservation. There can only be one all day reservation, so this is a conflict. Be sure to use the "Or" setting in the compound condition. Use the Set variable action to change scheduleConflict to true in this case. Otherwise we proceed to the next check.

In the second conflict check, we want to see if the trigger item DateTime value is greater than or equal to the loop item DateTime value AND is less than the loop item EndDateTime value. Be careful when selecting your fields since it is easy to confuse the trigger items fields and the loop items fields! As before, use the Set variable action to change scheduleConflict to true if there is a conflict found. Otherwise move on to the next check.

In the last conflict check, we want to see if the trigger item EndDateTime is greater than the loop item DateTime AND is less than or equal to the loop item EndDateTime value. As before, use the Set variable action to change scheduleConflict to true if there is a conflict found. We are done with all conflict checks!

Collapse the Apply to each loop since that part is done. Next add a condition to check the scheduleConflict variable. If it is true, then we must take action. Add a new condition in the yes branch. Be sure to add the logical "true operator" using the formula tool.

Next we need to check whether this is a new item added or an update to an existing reservation. We should handled these events differently.

Delete the item use the ID from the trigger item if this was a new add. An updated item shouldn't be deleted, but the person who modified should be warned to make a correction. Use whatever content you like in the emails. Example shown.

SharePoint Admin level users can easily create SharePoint Dashboards lists using the provided PowerShell list creation utility.
This utility creates lists with large numbers of fields via PowerShell script in seconds. This method is an alternative to downloading .stp files and loading classic SharePoint list templates.
» Download SharePoint List Creation Utility
REQUIREMENTS
DIRECTIONS


List views can be printed to the printer or as a PDF file. As long as the width of the view on the screen isn't too wide, then the content should show without issues.
The Print Grid template is specifically designed to faciliate list view print output.
The settings vary slightly depending on which browser you are using.
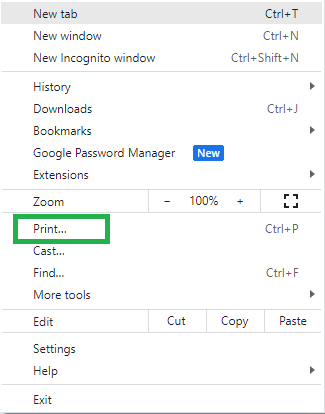
Chrome:
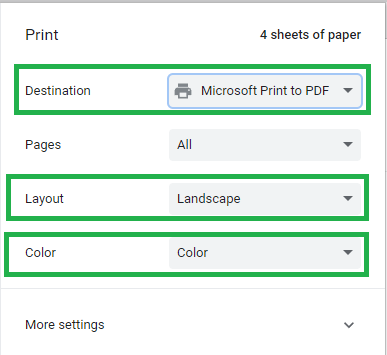
1. From your browser options menu select Print:
2. Pick your destination (either printer or PDF), set the Layout to Landscape and use Color printing.
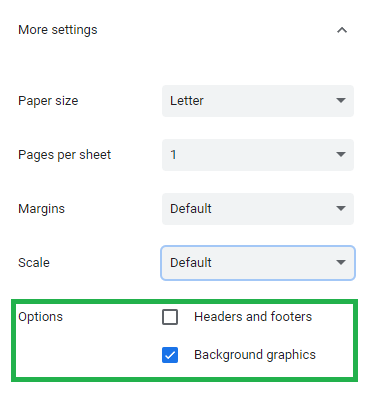
3. Open the More settings section and disable Headers and footers and enable Background graphics.
You can make further adjustments to other print settings, but normally this should not be necessary.
Edge:
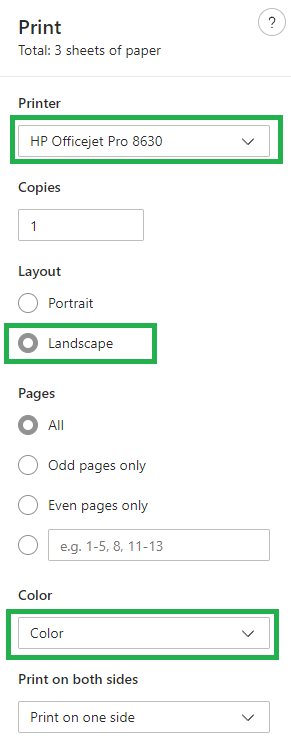
1. Open the print dialog from your brower. (Ctrl + P on a PC / Command + P on a Mac)
2. Pick your Printer option (either printer or PDF), set the Layout to Landscape and use Color printing.
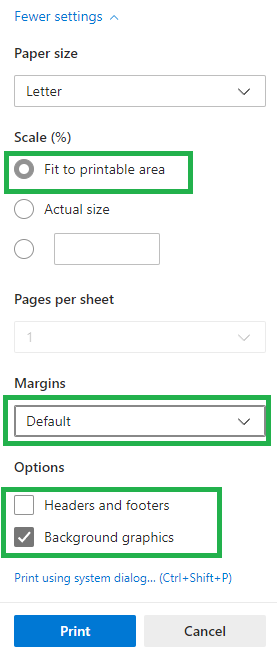
3. Open the More settings section and disable Headers and footers and enable Background graphics. Set the Scale as Fit to printable area.
You can make further adjustments to other print settings, but normally this should not be necessary.
When using the print method above, some elements can still appear that you do not want on the print output.
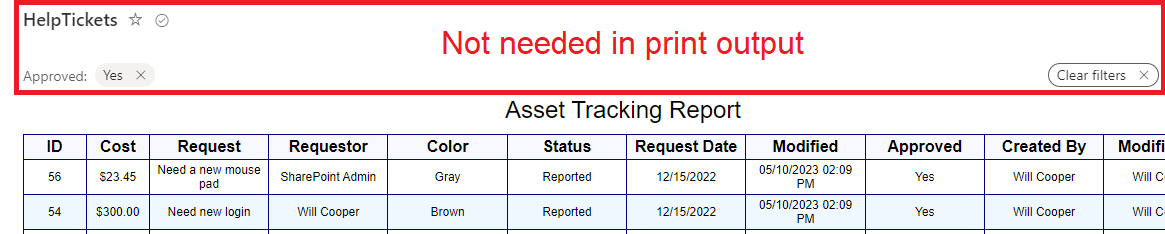
Using some custom CSS will suppress elements that appear in the list header such as filter settings.
Use the below CSS to force these elements to be hidden in print output:
/*PRINT CSS*/
@media print{
/*HIDE LIST HEADINGS IN PRINT OUTPUT ONLY*/
.od-ListTitle-heading {
display: none !important;
}
/*HIDE FILTER HEADERS IN PRINT OUTPUT ONLY*/
.od-filtersHeader {
display: none !important;
}
}
In order to load custom CSS to your SharePoint environment, you must be a SharePoint Admin and also be familiar with adding applications to the App Catalog in your SharePoint environment. A custom application which allows you to load a global CSS to SharePoint Online is provided along with instructions here:
https://github.com/hugoabernier/react-application-injectcss/