This tutorial describes how to set up an easy to use Email Reminder System in SharePoint using a SharePoint list and a custom Power Automate workflow. This system allows anyone in your organization to easily define rules to send out email reminders on a set schedule.
You should have moderate experience with Sharepoint and Power Automate to do theses steps. Support is NOT provided, but you may add questions below the YouTube video. Setting up rules is easy to manage. All notification rules can be monitored in one list.

This system includes these key features.
The first step is to set up a centrally accessible "Email Reminders" SharePoint list.
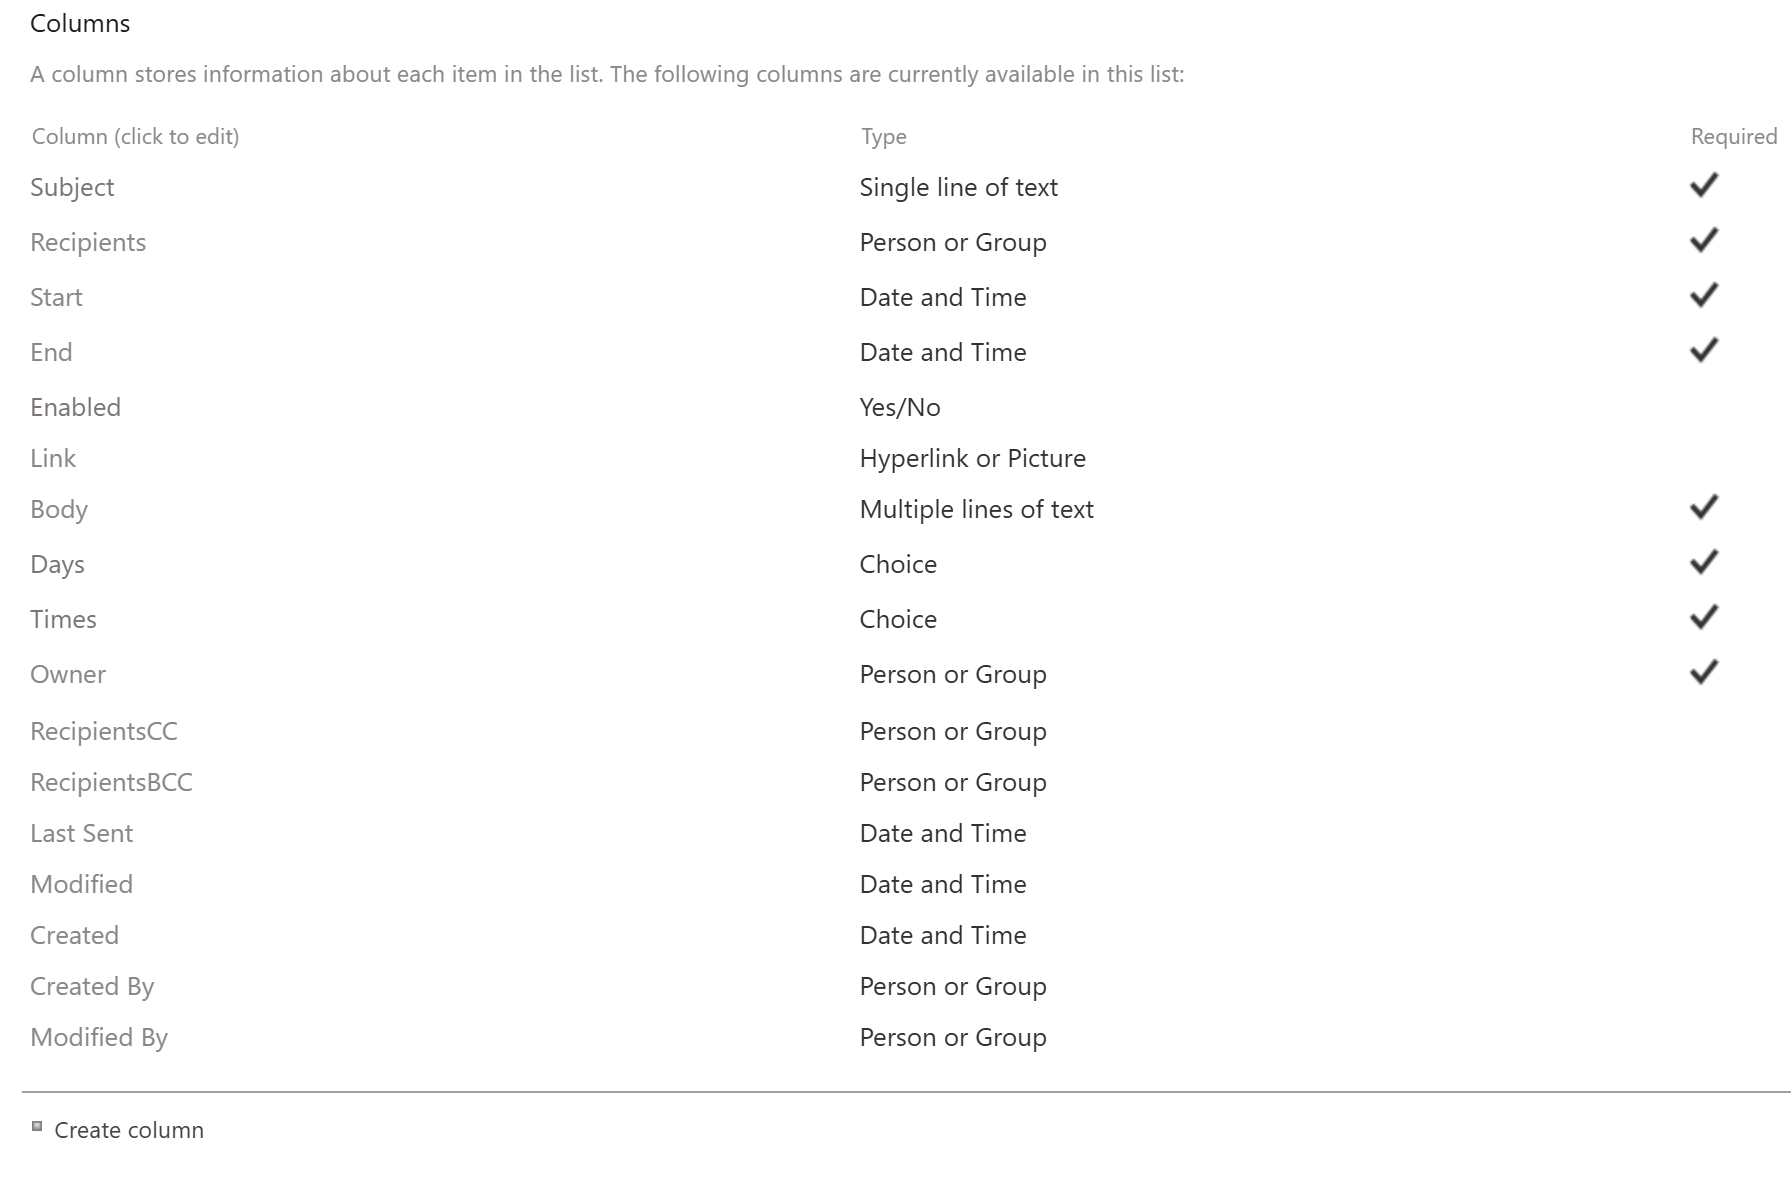
This List should be created with the following fields:
| Field Name | Field Type | Required | Default | Notes |
|---|---|---|---|---|
| Subject | Text | ✅ | Rename the title field to "Subject". | |
| Recipients | Person | ✅ | Enable multiselect. | |
| Start | Date | ✅ | Date only with no time setting. | |
| End | Date | ✅ | Date only with no time setting. | |
| Enabled | Yes/No | Yes | Default to Yes. | |
| Link | Hyperlink | Used for reference link at bottom of email content. | ||
| Body | Multiline Text | ✅ | Use multiline rich text. | |
| Days | Choice | ✅ | Mon | Use multiselect with options "Mon,Tue,Wed,Thu,Fri,Sat,Sun" |
| Times | Choice | ✅ | 9 | Use multiselect with options "0,1,2,3,4,5,6,7,8,9,10,11,12,13,14,15,16,17,18,19,20,21,22,23". These are hours of the day in military time reference. Provide less options if users don't need to send alerts in the middle of the night. |
| Owner | Person | ✅ | Used to track who manages the rule. | |
| RecipientsCC | Person | Enable multiselect. CC recipients. | ||
| RecipientsBCC | Person | Enable multiselect. BCC recipients. | ||
| Last Sent | Date Time | Used to automatically record the last date / time an email was sent. |
The complete list of fields looks like this on the list settings screen:
After creating the fields update your list view accordingly using view settings and column formatting to get an appearance like the screenshot at the top.
Setting up the workflow is a little bit tricky. All code snippets and instructions are provided below.
* Note that all code snippets reference "Eastern Standard Time". You should substitute your own local time zone.
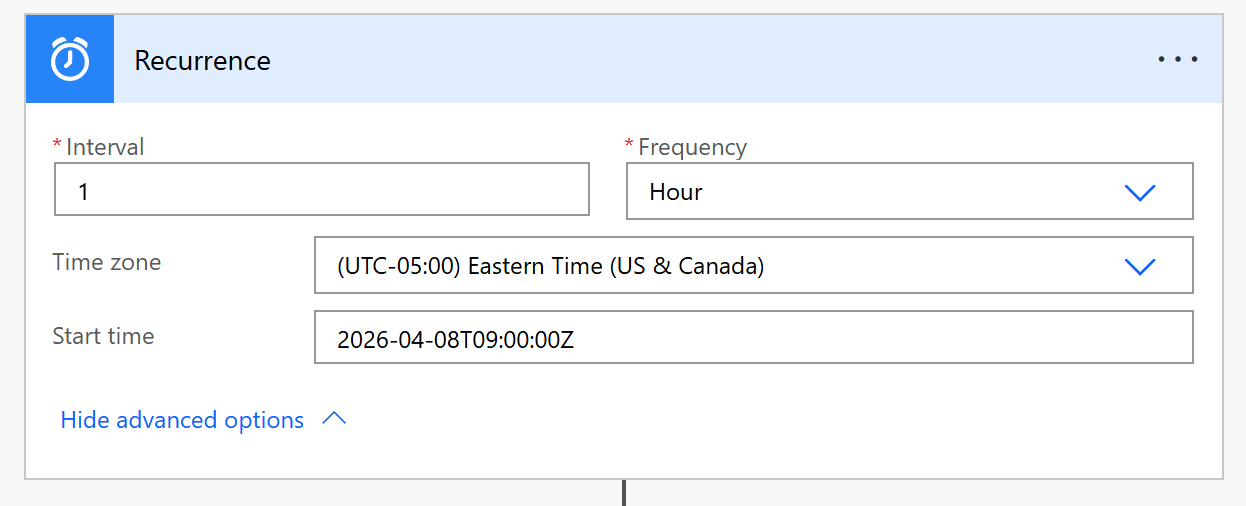
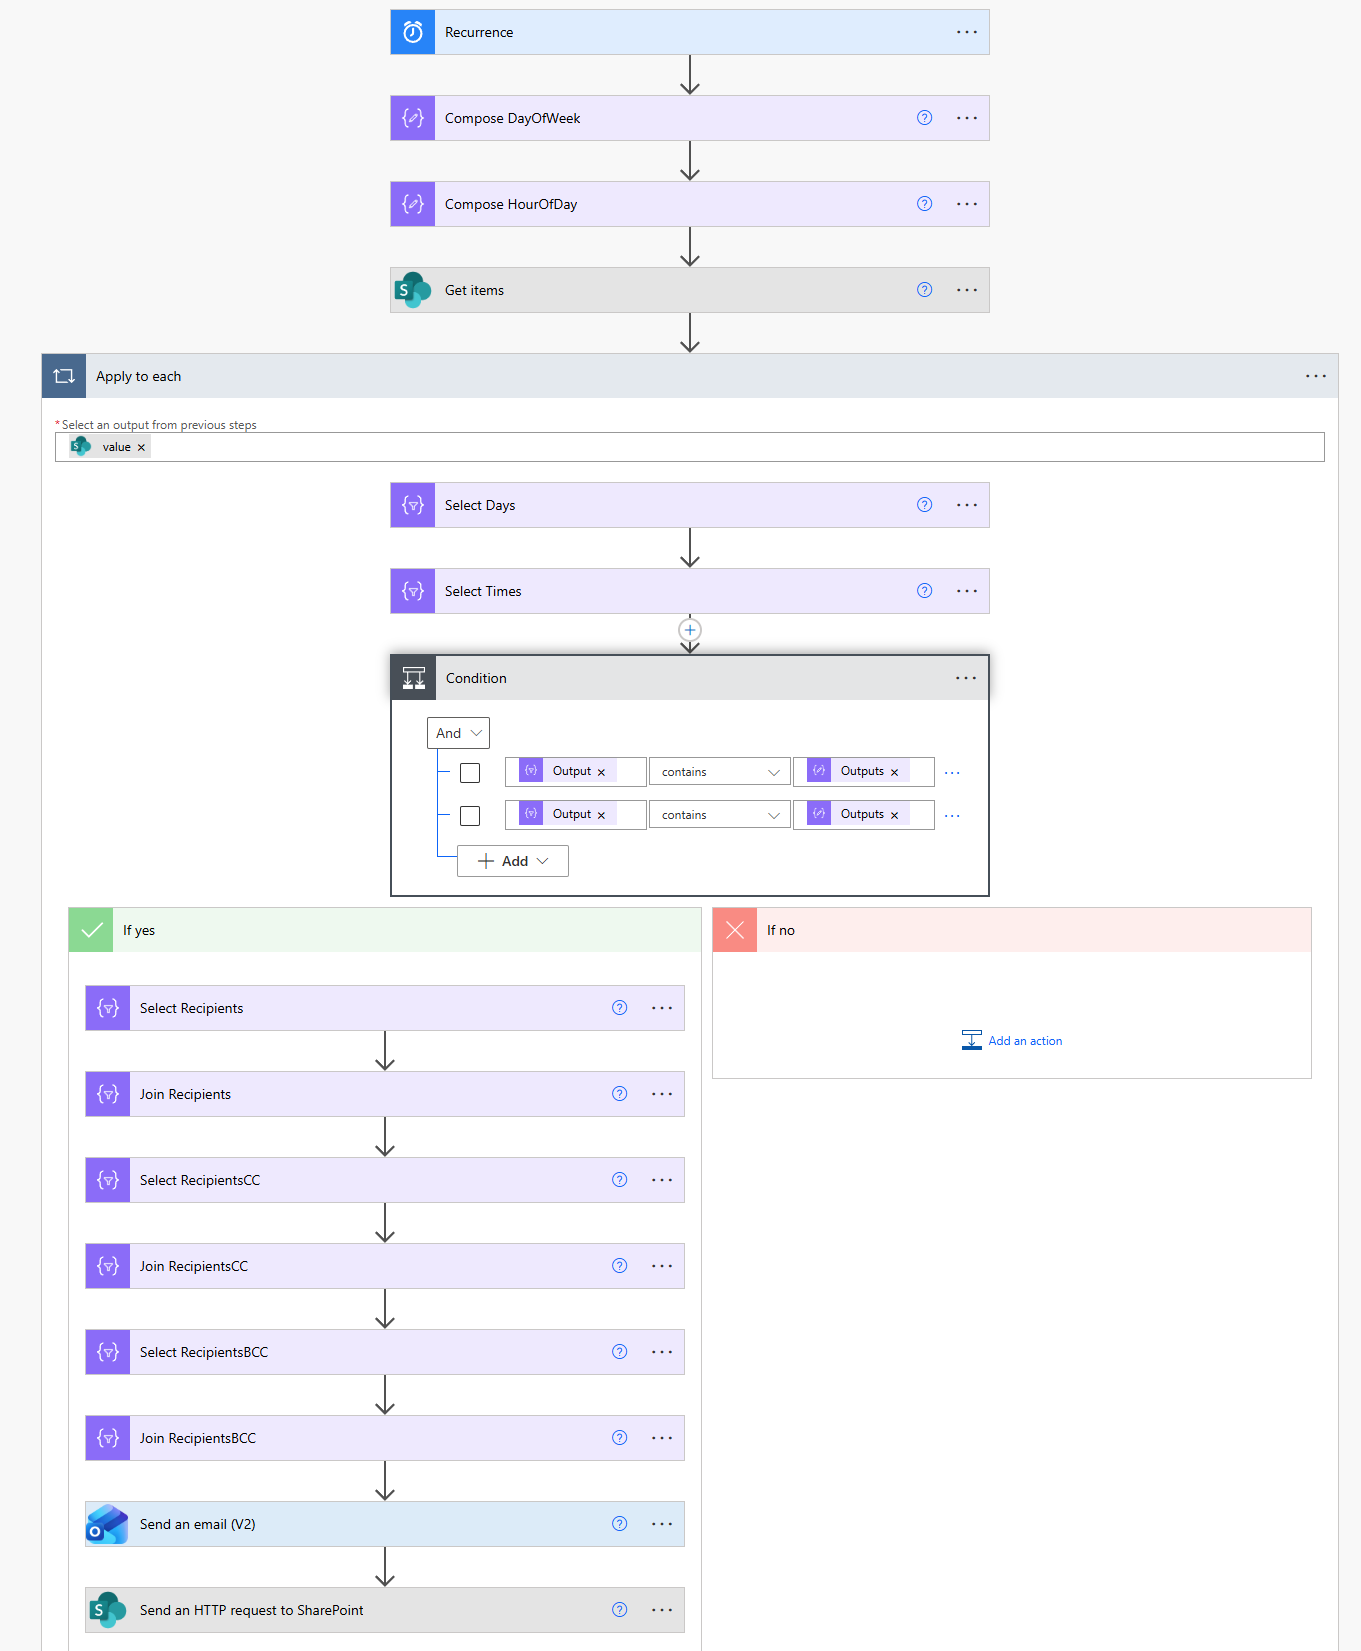
A. Begin by creating a new scheduled Flow which will run every hour, on the hour.
B. Next use two compose actions to get the day of the week and the hour of the day that the workflow runs. Use the code snippets provided.
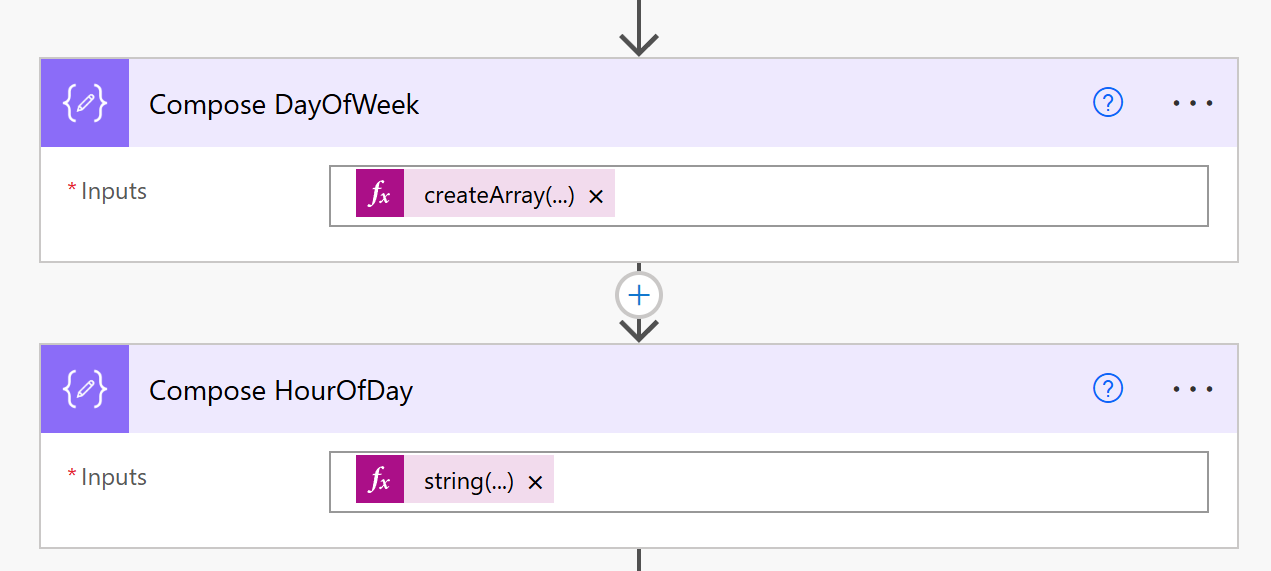
Day of the week:
createArray('Sun','Mon','Tue','Wed','Thu','Fri','Sat')[dayOfWeek(convertTimeZone(utcNow(),'UTC','Eastern Standard Time'))]
Hour of the day:
string(int(formatDateTime(convertTimeZone(utcNow(),'UTC','Eastern Standard Time'),'HH')))
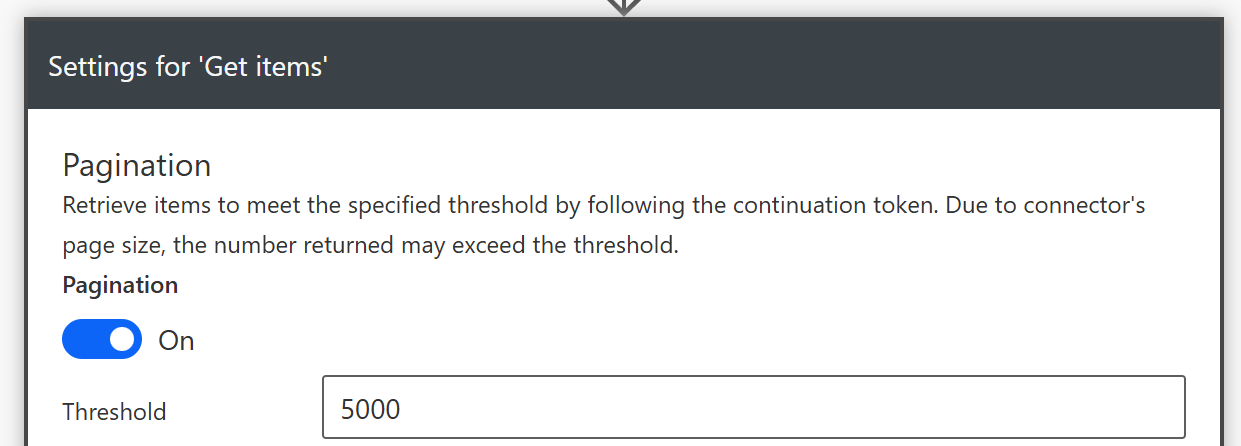
C. Use a get items with a filter query to select rules within the date range that are active.

Filter Query:
Enabled eq 1 and Start le 'EXPRESSION' and End ge 'EXPRESSION'
EXPRESSION:
formatDateTime(convertTimeZone(utcNow(),'UTC','Eastern Standard Time'),'yyyy-MM-dd')
Remember to turn on pagination with a 5,000 items threshold so that the workflow is capped at 100 results.
D. Add an Apply to each action and two selects for the days and times. Use the code snippets provided.
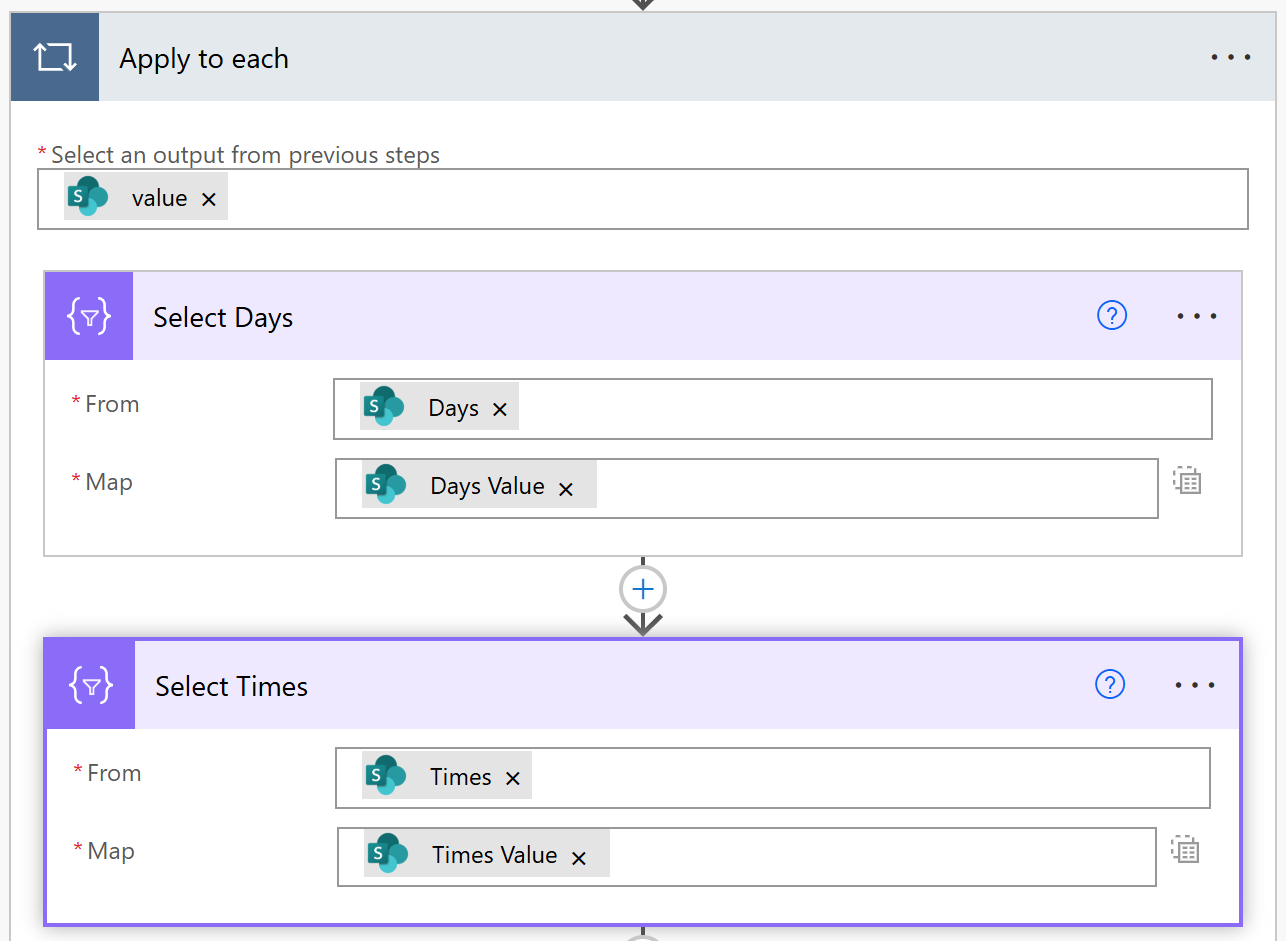
outputs('Get_items')?['body/value']
items('Apply_to_each')?['Days']
item()?['Value']
items('Apply_to_each')?['Times']
item()?['Value']
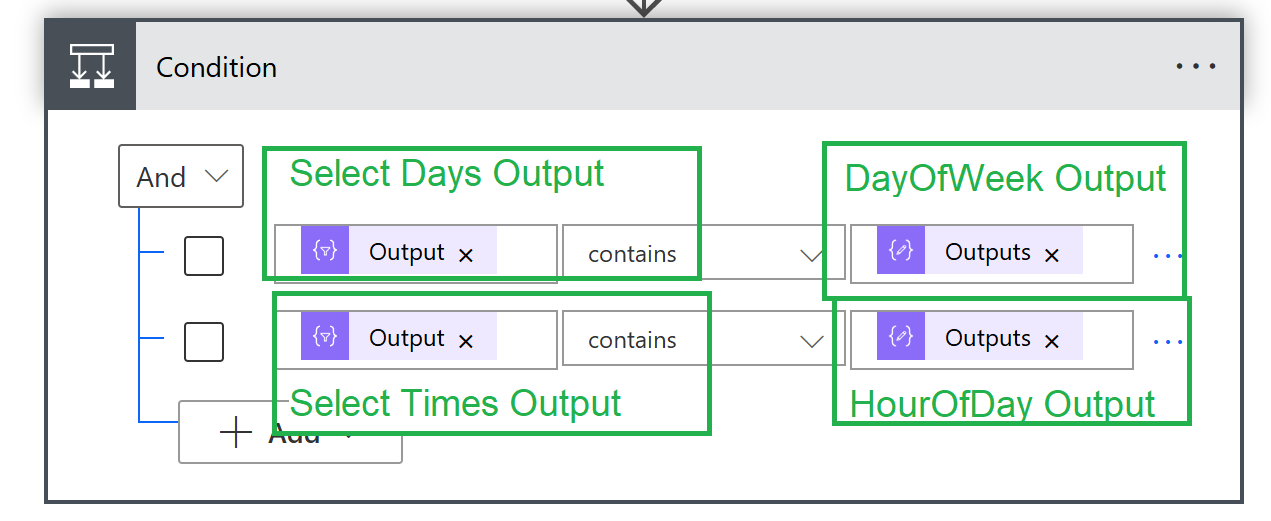
E. Next set up a compound condition to check that the day and time match what is selected in the rule. Carefully select the outputs as indicated using the contains comparison. This will ensure an email is only sent on the selected day(s) and time(s).
F. In the "Yes" path, we will finish out the Flow. In order to get the email addresses of all users in the multi select person fields, we need to use a Select action and then a join action to get ";" delimited email addresses. Use a pair of actions for each of the 3 person fields "Recipients", "RecipientsCC" and "RecipientsBCC". Use the provided code snippets. Each Join action references the output of the Select immediately above.
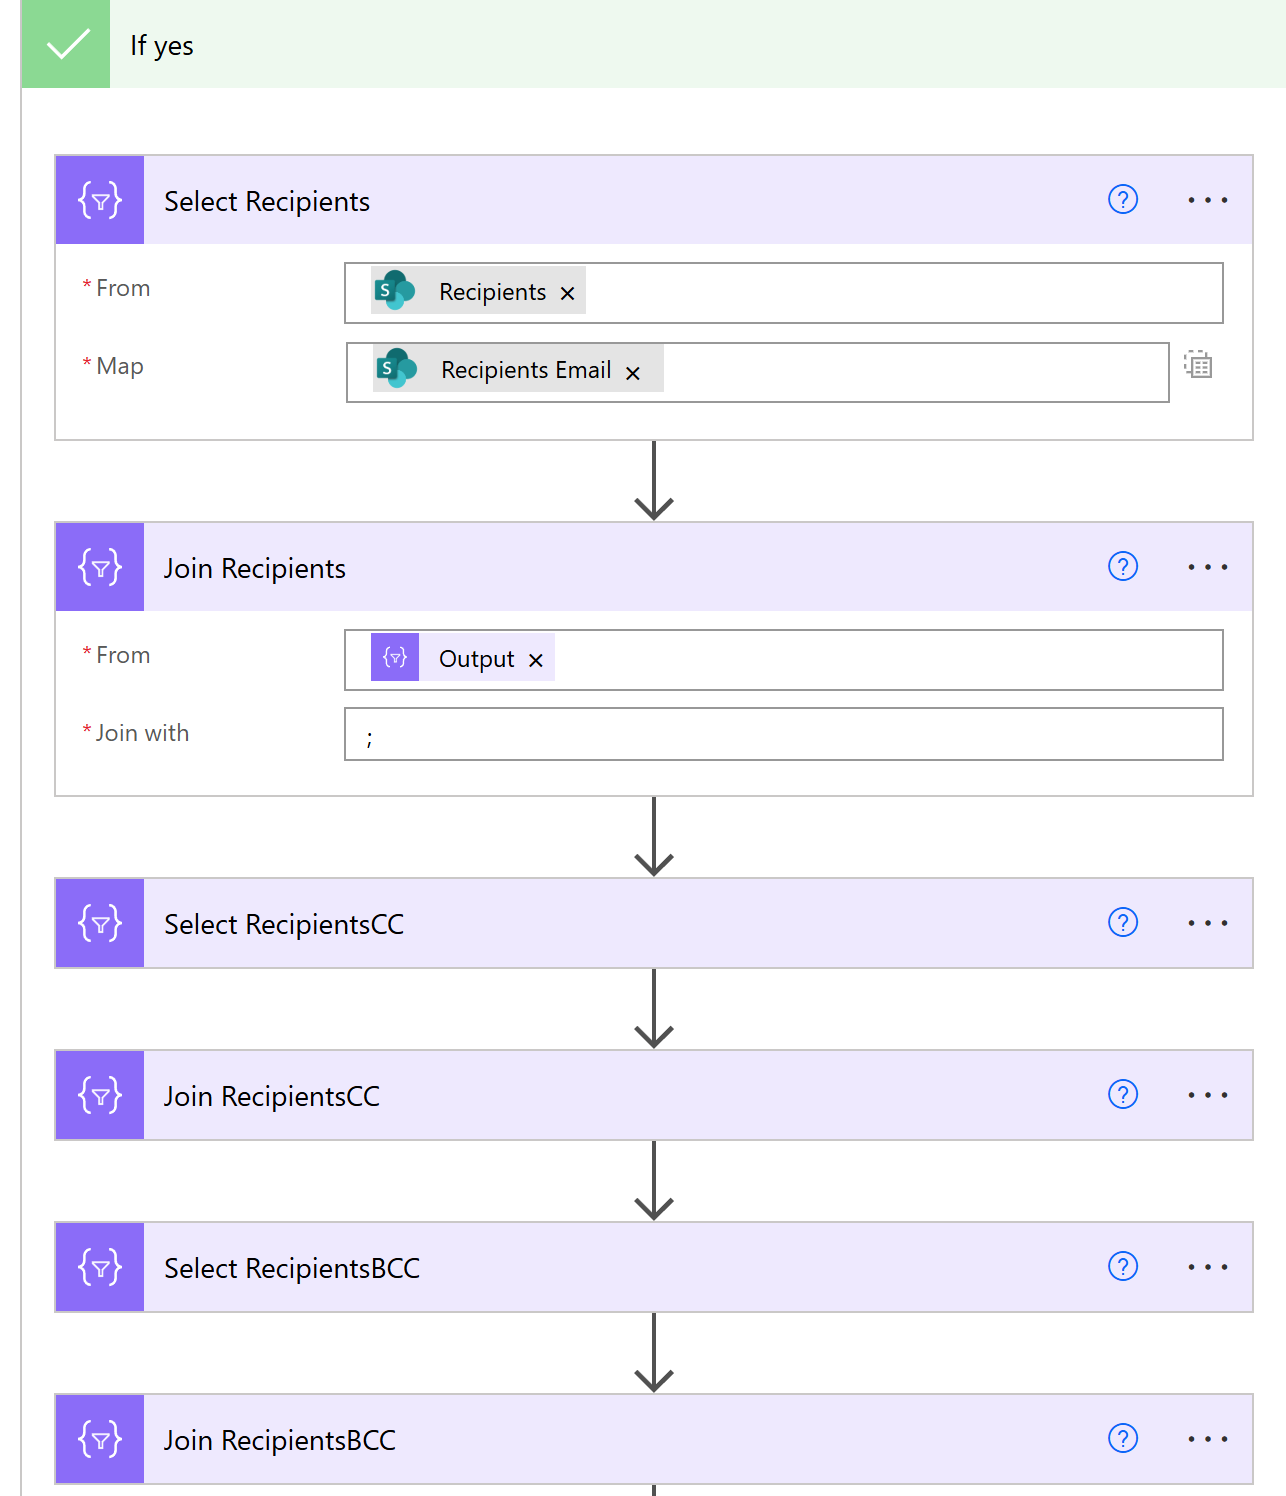
items('Apply_to_each')?['Recipients']
item()?['Email']
items('Apply_to_each')?['RecipientsCC']
item()?['Email']
items('Apply_to_each')?['RecipientsBCC']
item()?['Email']
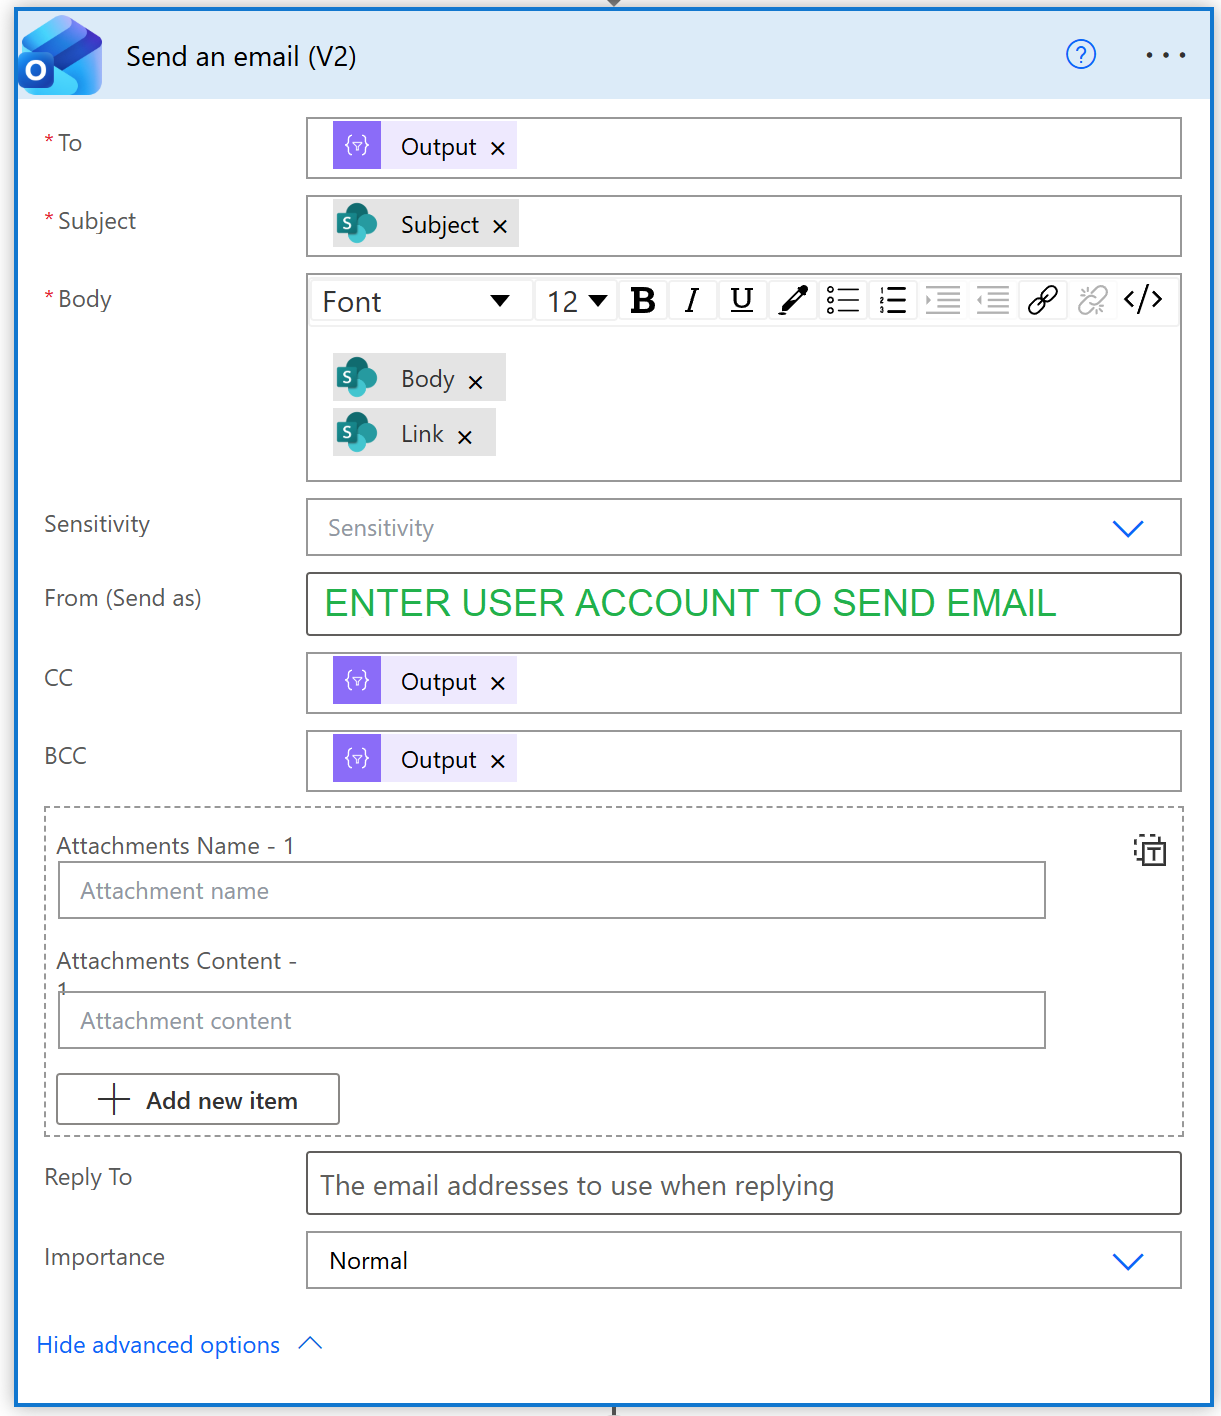
G. At long last, we are ready to send the email. Use the outputs of the Join actions for To, CC and BCC fields. The Subject, Body and Link fields are added where you would expect as shown. For the sender, by default it must be your account, but ideally this should be a "no reply" email user account. If your organization doesn't already have this, you can create a new user in M365 user management and assign an Exchange license to the user so that it can send email. Be sure that YOUR account is added on that account as allowed to send email.
H. There is one final step. We want to update the "Last Sent" field with a date time stamp each time an email goes out for each rule. The cleanest way to do this is via a SharePoint HTTP Request. Note that if you named your list something different than "Email Reminders" you will need to adjust the Uri field and the Body accordingly. Use the code snippets provided.
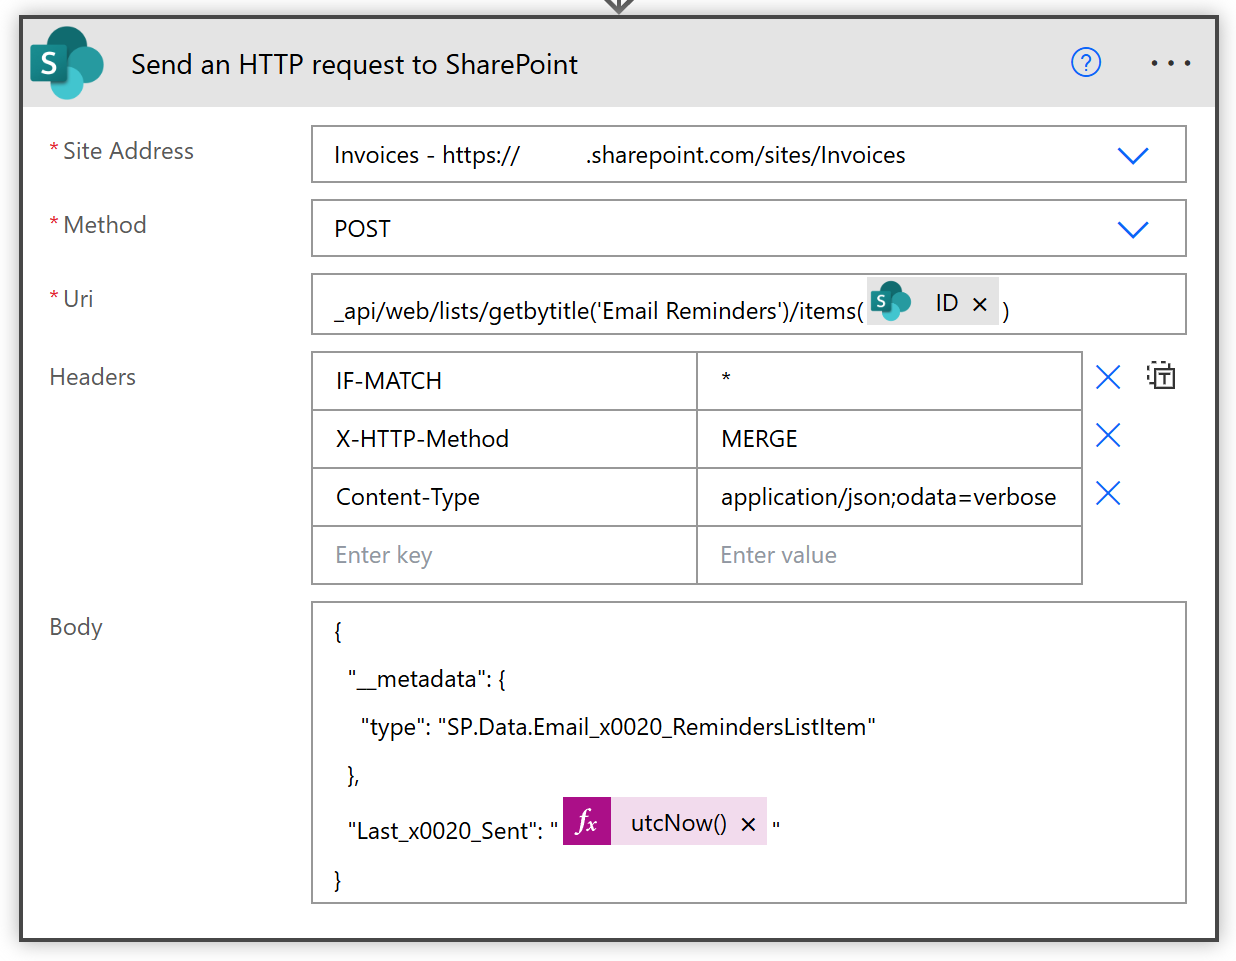
_api/web/lists/getbytitle('Email Reminders')/items(INSERT ID REFERENCE)
IF-MATCH *
X-HTTP-Method MERGE
Content-Type application/json;odata=verbose
{
  "__metadata": {
    "type": "SP.Data.Email_x0020_RemindersListItem"
  },
  "Last_x0020_Sent": "INSERT UTCNOW() REFERENCE"
}
When you are finished, the high level view of the Flow will look like this:
Final Testing: Now you are ready to test your Flow by creating some email rules. The Flow will run hourly, but you can trigger it manually for testing. There are plenty of ways that this solution could be further enhanced with more features according to requirements in your own organization. Good luck!